By: AY1920S1-CS2103T-W12-1 Since: Aug 2019 Licence: MIT
- 1. Introduction
- 2. Quick Start
- 3. Features
- 3.1. Viewing help :
help - 3.2. Adding a person
add_contact - 3.3. Editing a contact :
edit_contact - 3.4. Adding a claim :
add_claim - 3.5. Approving a claim :
approve - 3.6. Rejecting a claim :
reject - 3.7. Adding an income :
add_income - 3.8. Editing an income :
edit_income - 3.9. Deleting an Income :
delete_income - 3.10. Creating a shortcut
- 3.11. Deleting a shortcut :
delete_shortcut - 3.12. Changing Views :
goto - 3.13. Checking a Contact or Claim :
check - 3.14. Sorting the Contacts/Claims/Incomes list by Contact’s Name
- 3.15. Sorting the Claims/Incomes list by Date
- 3.16. Sorting the Claims list by Status
- 3.17. Sorting the Contacts/Claims/Incomes list in reverse order
- 3.18. Sorting the Claims/Incomes list in reverse order by Date
- 3.19. Sorting the Claims list in reverse order by Status
- 3.20. Deleting a Contact :
delete_contact - 3.21. Viewing budget :
budget - 3.22. Clearing all data :
clear - 3.23. Making a mistake :
<any invalid entry> - 3.24. Exiting the program :
exit - 3.25. Saving the data
- 3.1. Viewing help :
- 4. Non-command Features
- 5. Upcoming Features (To be implemented in v2.0)
- 6. FAQ
- 7. Command Summary
1. Introduction
FinSec is a Financial Planner that helps the finance secretaries of any department in National University of Singapore,
preferably from the School of Computing so that they would be more likely to like the idea of having a Command Line Interface (CLI) app.
The app focuses on the tracking of claims that will help the While FinSec has a Graphical User Interface (GUI), its main form of input is CLI based,
thus favoring people who can type fast.
We are the solution to all of your organisation’s financial needs.
What are you waiting for? Download the app now and enjoy!
2. Quick Start
-
Ensure you have Java
11or above installed in your Computer. -
Download the latest
finsec.jarhere. -
Copy the file to the folder you want to use as the home folder for your Address Book.
-
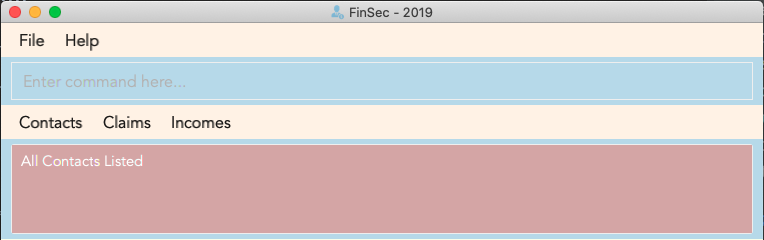
Double-click the file to start the app. The GUI should appear in a few seconds.
Figure 2.1 shows the UI of the application upon booting up.
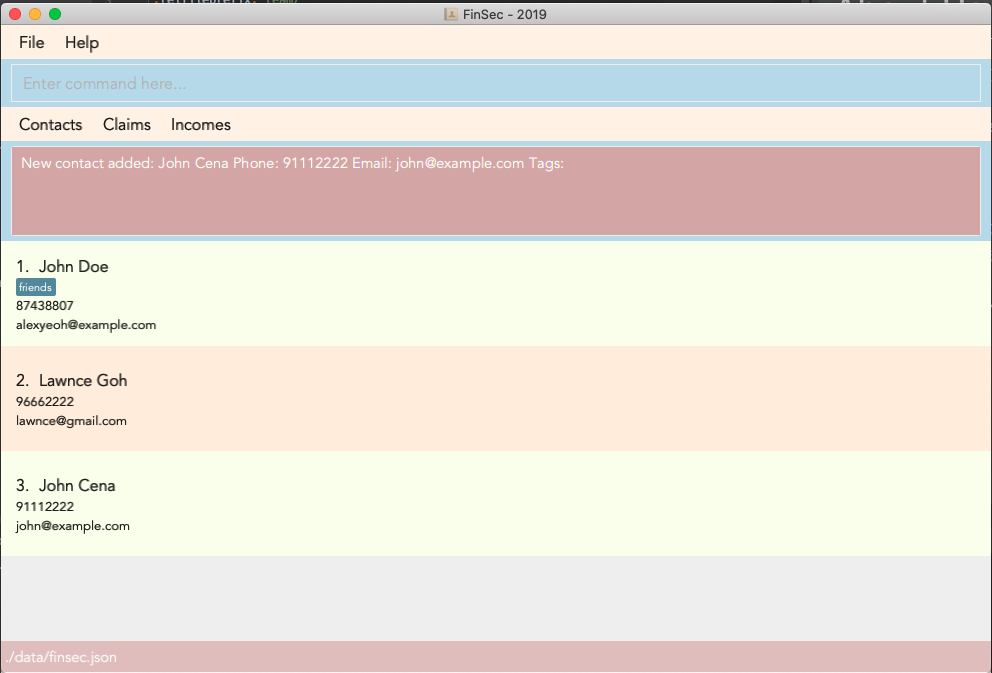 Figure 2.1: Finsec’s UI when you open up the application
 -
Type the command in the command box and press Enter to execute it.
e.g. typinghelpand pressing Enter will open the help window. -
Some example commands you can try:
-
add_contactn/John Doe p/98765432 e/john@example.com: adds a contact named John Doe to FinSec. -
delete_contact3: deletes the 3rd contact shown in the current list -
exit: exits the app
-
-
Refer to Section 3, “Features” for details of each command.
3. Features
Command Format
-
Words in
UPPER_CASEare the parameters to be supplied by the user e.g. inadd_claim n/NAME d/DESCRIPTION c/CASH AMOUNT date/DATE(dd-MM-yyyy),NAME,DESCRIPTION,CASH AMOUNT,DATE,PHONE NUMBERare parameters that the user has to type in. -
Items in square brackets are optional e.g
n/NAME [t/TAG]can be used asn/John Doe t/friendor asn/John Doe. -
Items with
… after them can be used multiple times including zero times e.g.[t/TAG]…can be used ast/friend,t/friend t/familyetc. -
Parameters can be in any order e.g. if the command specifies
n/NAME p/PHONE_NUMBER,p/PHONE_NUMBER n/NAMEis also acceptable.
3.1. Viewing help : help
The help feature Provides 3 different types of help for all commands in FinSec. To request for help, use the command syntax given below.
Keyword: help
Format:
help cmd/COMMAND type/TYPE
Refer to Section 7, “Command Summary” for all available commands
Types include:
brief (gives a brief description)
guide (opens a web browser and bring you to our user guide)
api (for advanced users who want to know the inner workings of the command)

Cant remember all of FinSec’s commands or the command format for help? No worries! Even if you mistakenly
type help without the other parameters or get the parameters confused, a default help window such as the one below
will appear and display a command list with similar instructions to this page!
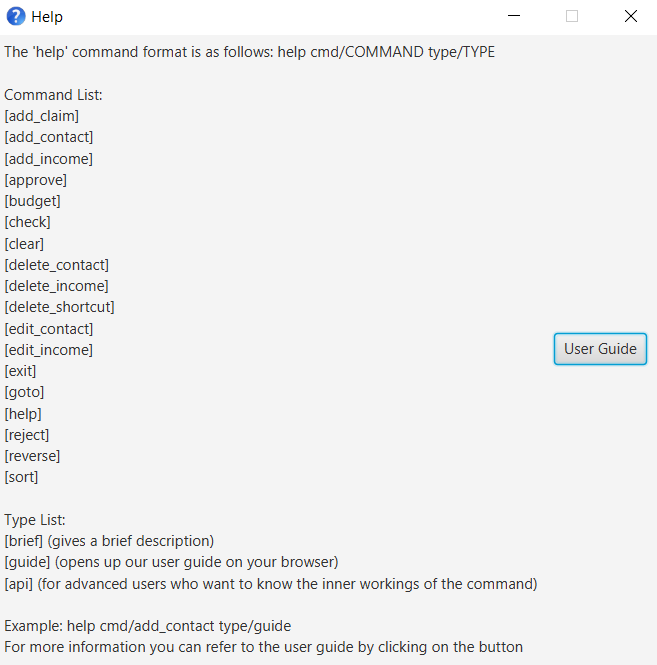
help
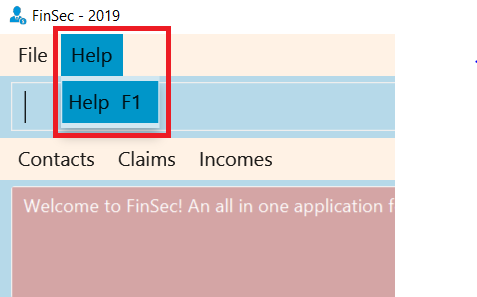
Instead of typing in help, you can also access help by clicking on the help button
on the top left of the FinSec application GUI or just press F1 on your keyboard
as shown below!
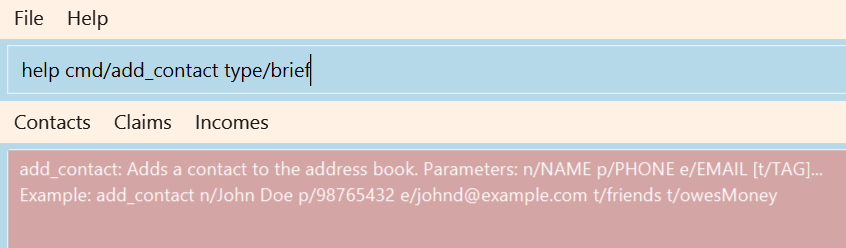
Example commands:
help cmd/add_contact type/brief
This shows you a brief description of what the add_contact command does and how to use it
help cmd/goto type/api
This generates an 'API.html' file containing our API for the goto command, and opens it up
help cmd/help type/guide
This opens up a page in your browser and brings you right here to this section!
Figure 3.1.3 shows what you can expect to see when typing in the first example: help cmd/add_contact type/brief.
add_contact command3.2. Adding a person add_contact
Adds a contact to the contacts list list
Format:
add_contact n/NAME p/PHONE_NUMBER e/EMAIL [t/TAG]
Examples:
add_contact n/John Doe p/98765432 e/johnd@example.com
Warning
-
There should not be duplicate
NAMES. -
Only valid Singapore
PHONEnumbers (8 digits) are allowed. -
Only valid
EMAILaddresses are accepted.
3.3. Editing a contact : edit_contact
Edits an existing contact
Keyword: edit_contact
Format:
edit_contact INDEX n/NAME p/PHONE_NUMBER e/EMAIL [t/TAG]
Examples:
edit_contact 2 n/john lim p/92222223 e/johnlim@gmail.com
Warning
-
Parameter warnings as per add_claim above.
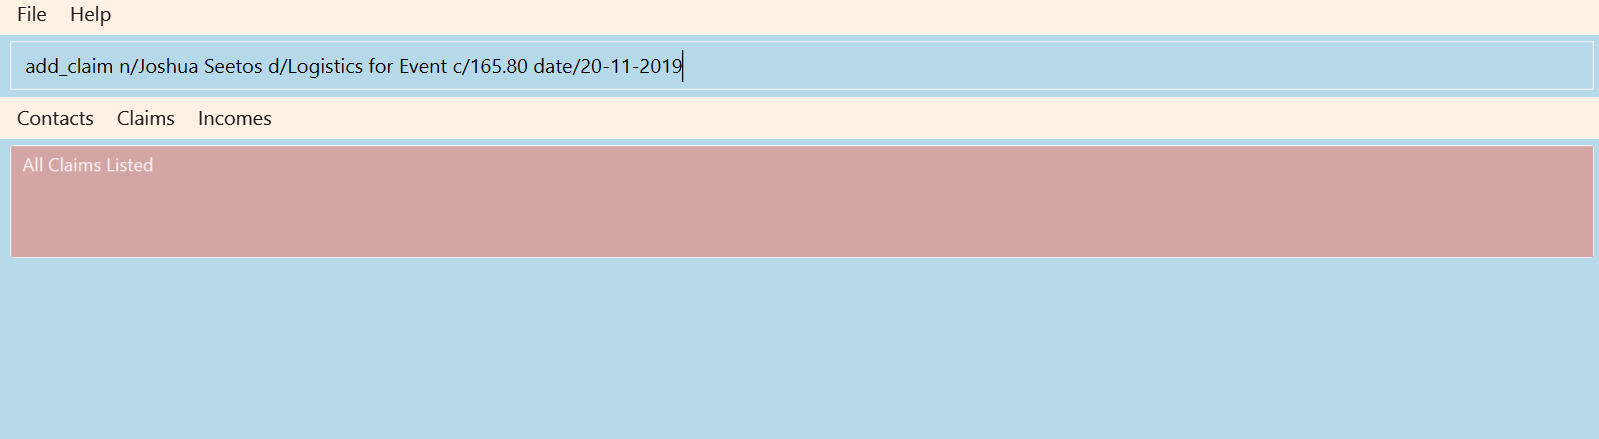
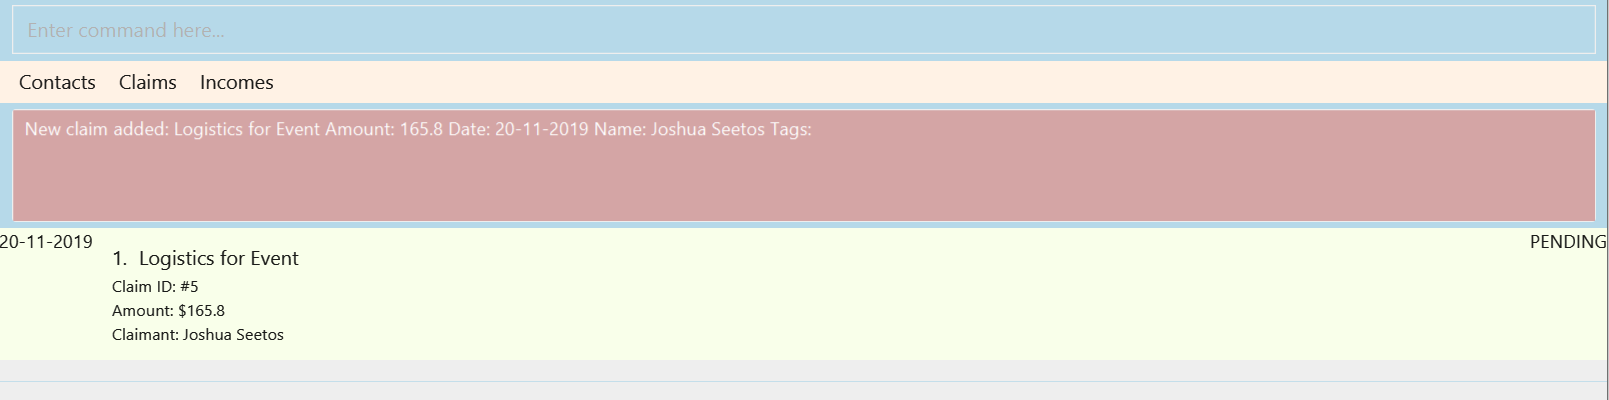
3.4. Adding a claim : add_claim
To add a claim to the claim list.
Keyword: add_claim
Format: add_claim n/NAME d/DESCRIPTION_OF_CLAIM c/AMOUNT date/DATE [t/TAG]
Example:
add_claim n/Lee Wei Gen d/Sports Equipment c/115.2 date/29-12-2019 t/Sports t/Equipment
Figure 3.4.1 and Figure 3.4.2 shows what you can expect to see after adding a claim.
Warning
-
AMOUNTshould be up to 2 decimal places only. -
DATEshould be a valid date in the form of "dd-MM-yyyy"(eg. 29-02-2019 not valid). -
A contact must already exist with the inputted
NAME(if not who is claiming it?)
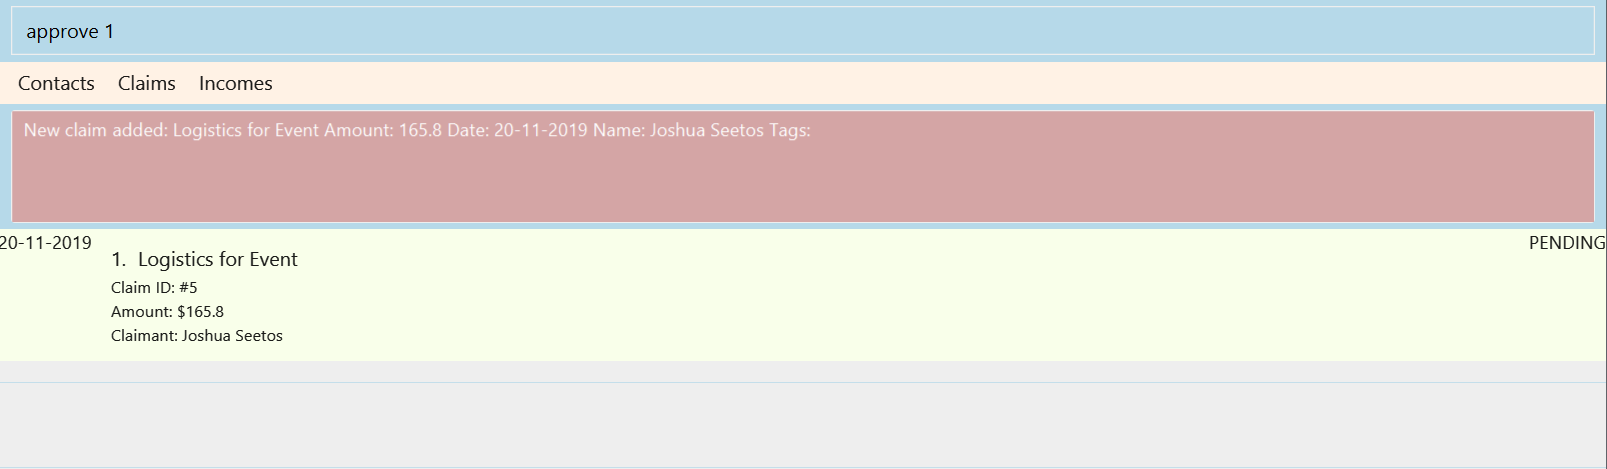
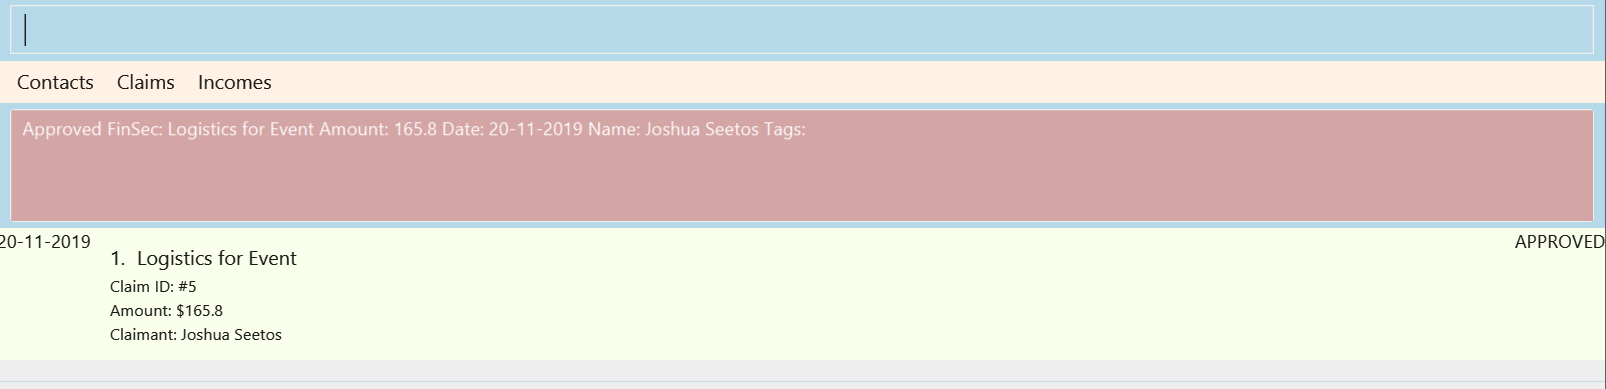
3.5. Approving a claim : approve
To approve a claim at the specified INDEX.
Keyword: approve
Format: approve INDEX
Example:
approve 1
The above example approves the first claim in the claim list.
Figure 3.5.1 and Figure 3.5.2 shows what you can expect to see after approving a claim.
Warning
-
The claim list must be currently displayed.
-
Claim at the specified
INDEXmust be a pending claim. -
INDEXrefers to the index number shown in the displayed claim list. -
INDEXmust be a positive integer 1, 2, 3, …, and cannot be larger than the maximum index of the displayed claim list.
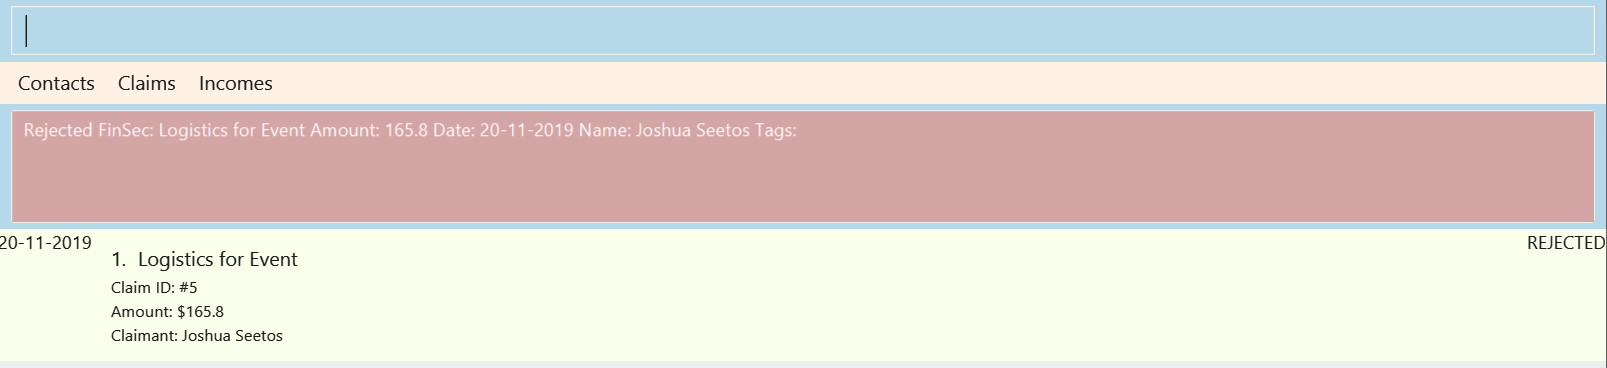
3.6. Rejecting a claim : reject
To reject a claim at the specified INDEX.
Keyword: reject
Format: reject INDEX
Example:
reject 1
The above example rejects the first claim in the claim list.
Figure 3.6.1 and Figure 3.6.2 shows what you can expect to see after rejecting a claim.

Warning
-
Warning as per Approve command!
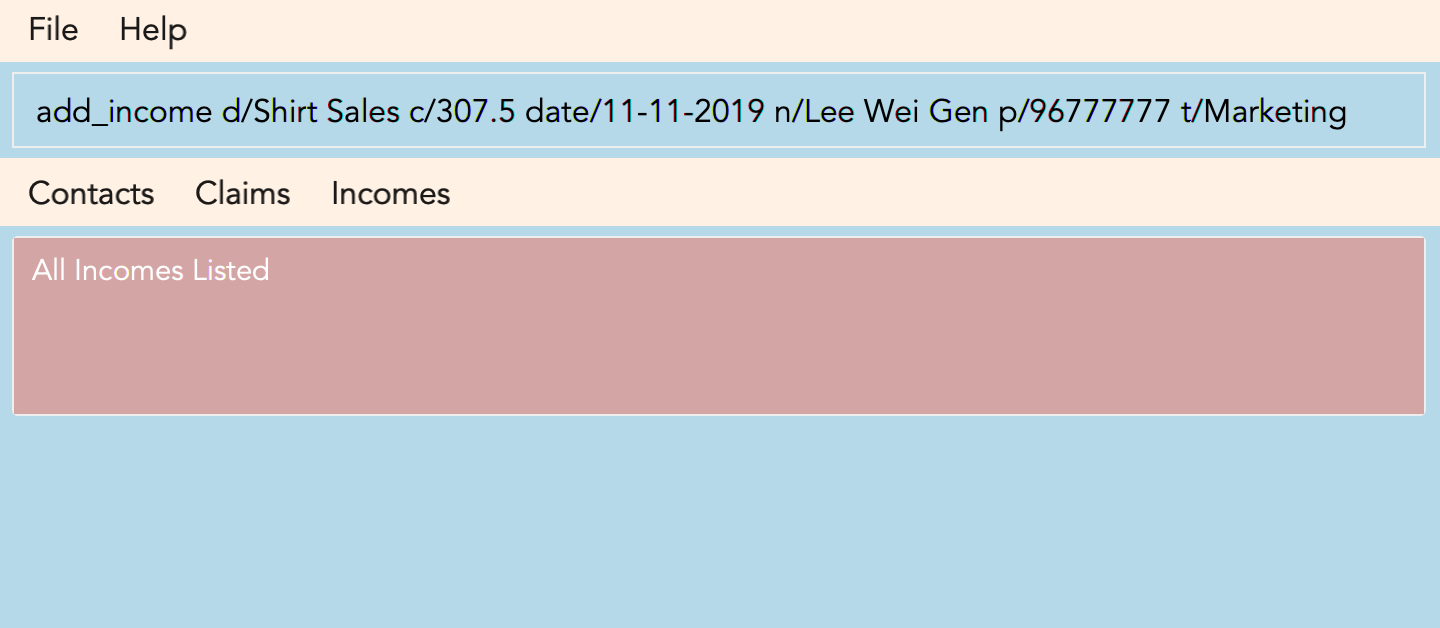
3.7. Adding an income : add_income
You can add an income to the incomes list by using the add income command by entering the keyword add_income followed by the required fields of an income.
Keyword: add_income
Format: add_income d/DESCRIPTION_OF_INCOME a/AMOUNT date/DATE n/PERSON_NAME p/PHONE_NUMBER [t/TAG]
Example:
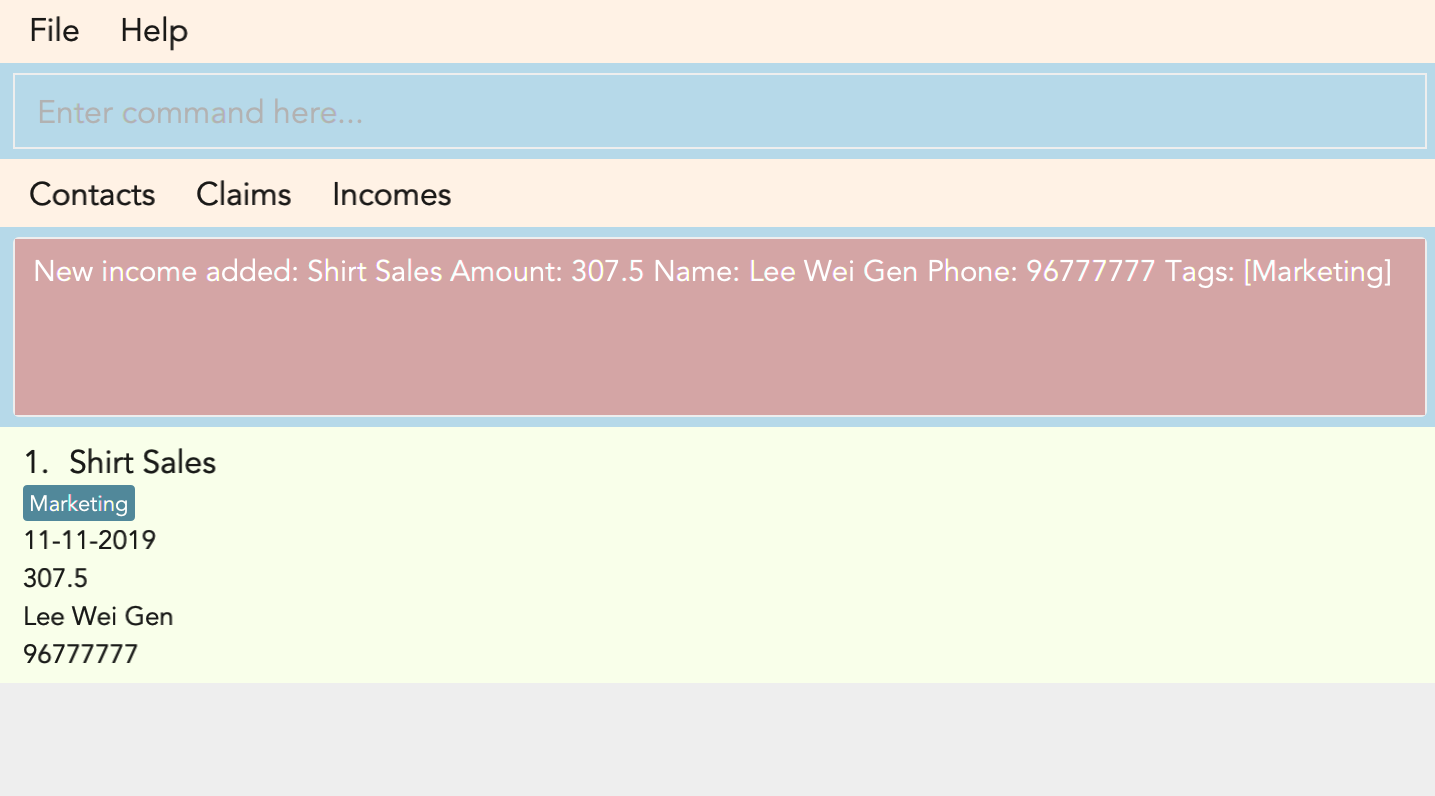
add_income d/Shirt Sales c/307.5 date/11-11-2019 n/Lee Wei Gen p/96777777 t/Marketing
Result:
This command will then add an income to the incomes list.
Figure 3.8.1 and Figure 3.8.2 shows what you can expect to see after typing in the example: add_income d/Shirt Sales c/307.5 date/11-11-2019 n/Lee Wei Gen p/96777777 t/Marketing.
Warning
-
add_incomeparameter warnings as peradd_claim.
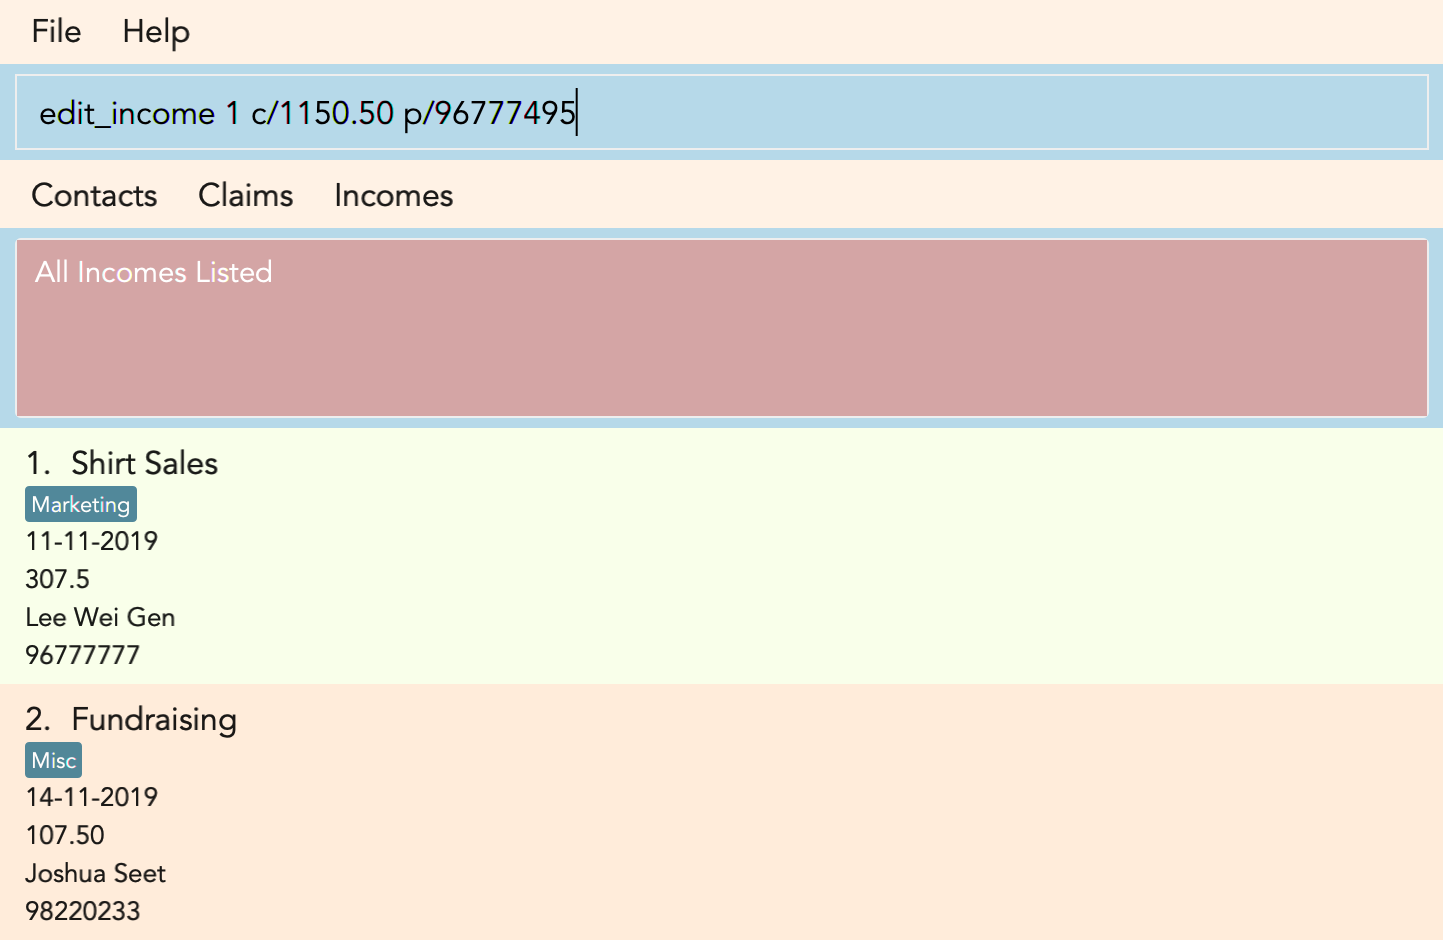
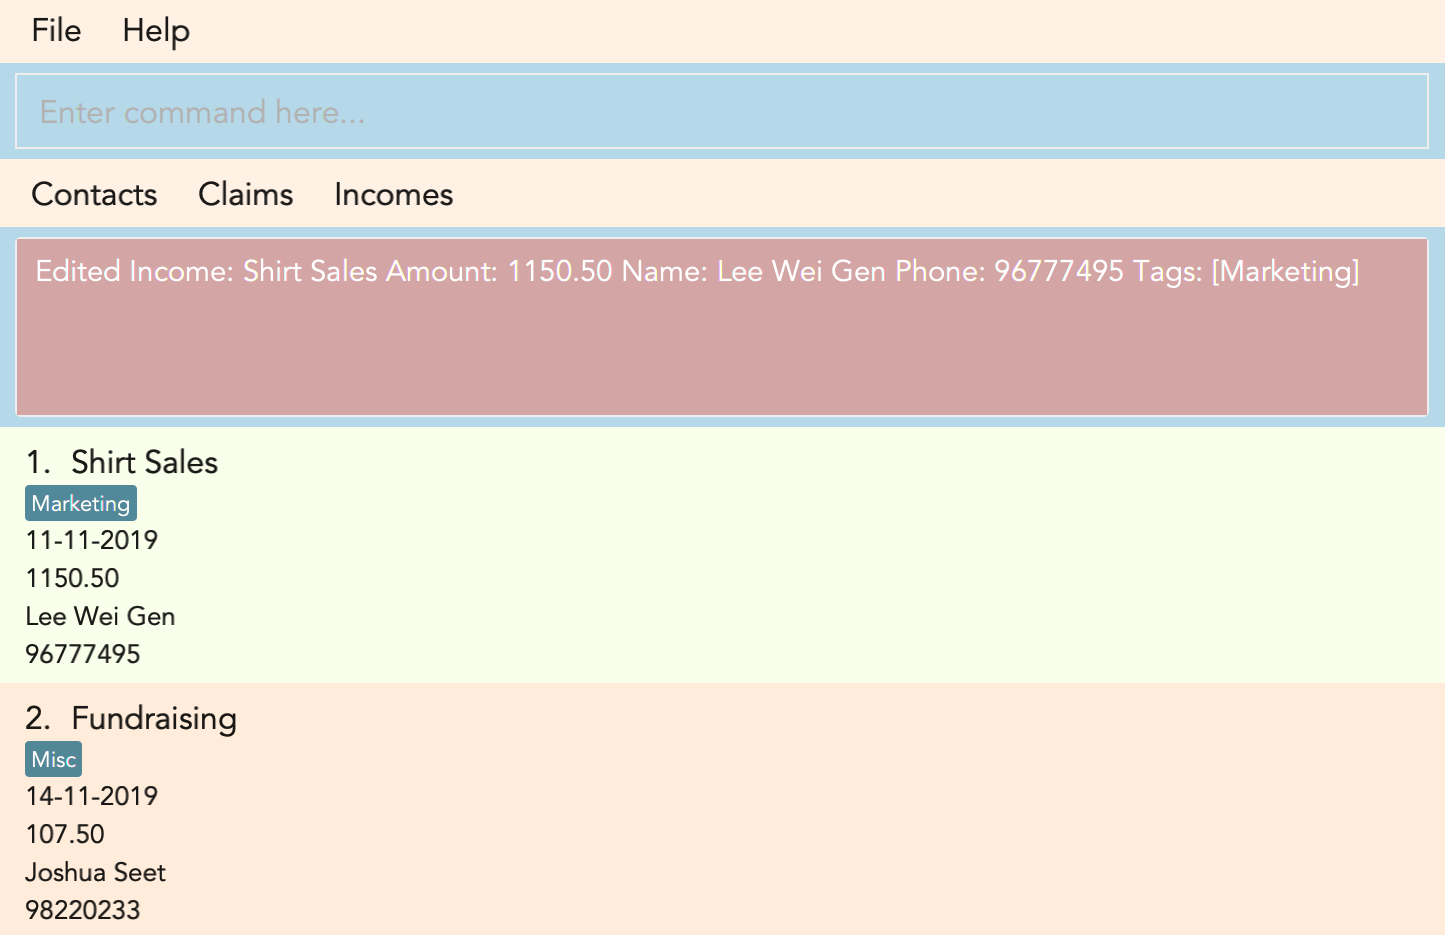
3.8. Editing an income : edit_income
If you accidentally entered the wrong details of the income or you want to make changes to a entered income, you can edit an income by using the edit income command by entering the keyword edit_income
followed by the position of the income in the incomes list, and the fields that you want to change.
Keyword: edit_income
Format: edit_income INDEX d/DESCRIPTION_OF_INCOME a/AMOUNT n/PERSON_NAME p/PHONE_NUMBER [t/TAG]
Example:
edit_income 1 c/1150.50 p/96777495
Result:
This command will edit the description and amount fields in the second income in the list to the newly specified description and amount.
Figure 3.8.1 and Figure 3.8.2 shows what you can expect to see after typing in the example: edit_income 1 c/1150.50 p/96777495.
Warning
-
add_incomeparameter warnings as peradd_claim.
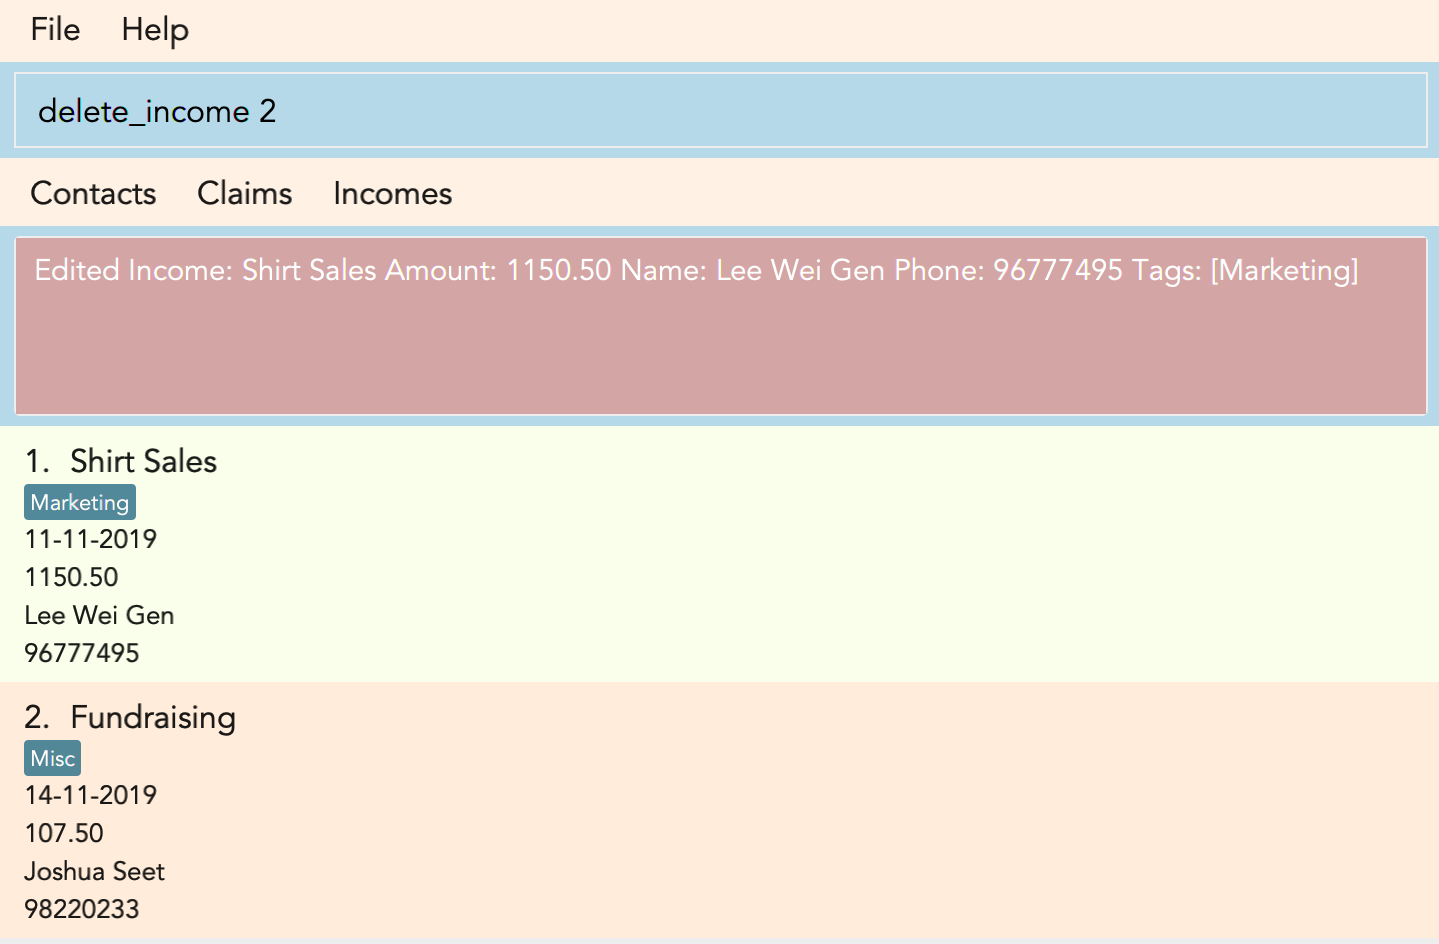
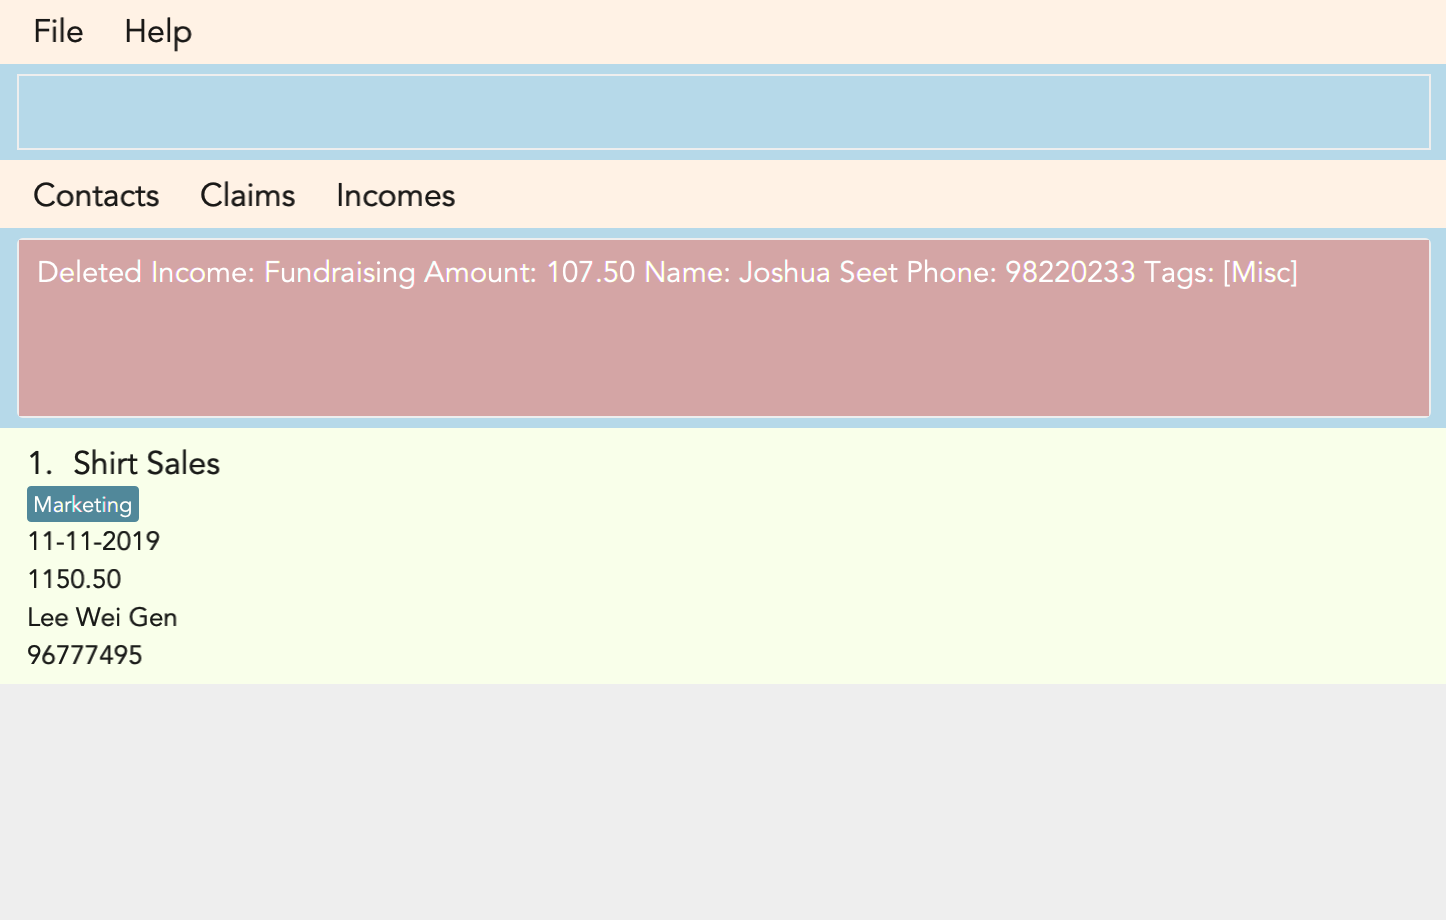
3.9. Deleting an Income : delete_income
You can delete an income off the incomes list by using the delete income command by entering the keyword delete_income followed by the position of the income in the incomes list.
The specified index will be then deleted.
Keyword: delete_income
Format: delete_income INDEX
Example:
delete_income 2 (removes second income in the income list)
Result:
Deletes the income at the specified INDEX.
Figure 3.9.1 and Figure 3.9.2 shows what you can expect to see after typing in the example: delete_income 2.
Warning
-
The index refers to the index number shown in the displayed income list.
-
The index must be a positive integer 1, 2, 3, …
3.10. Creating a shortcut
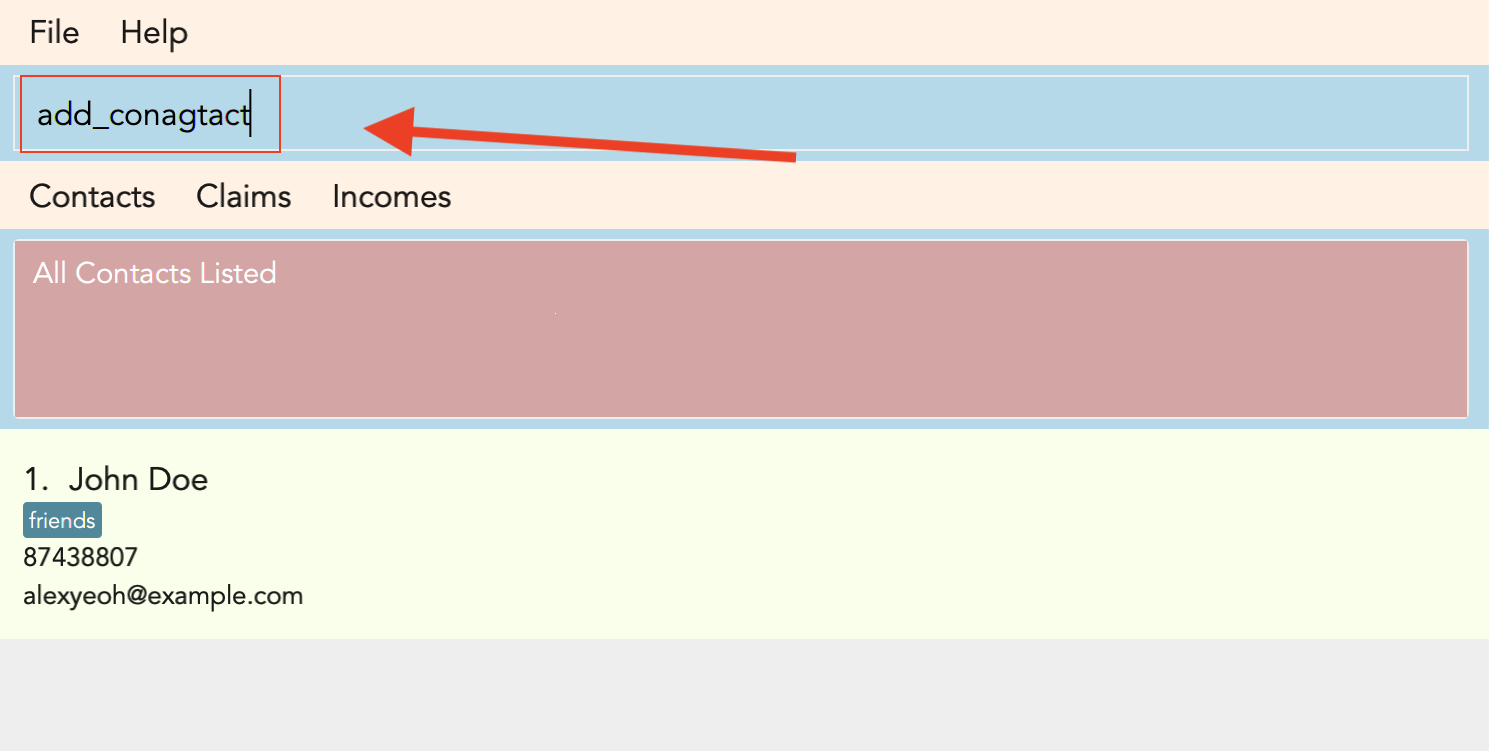
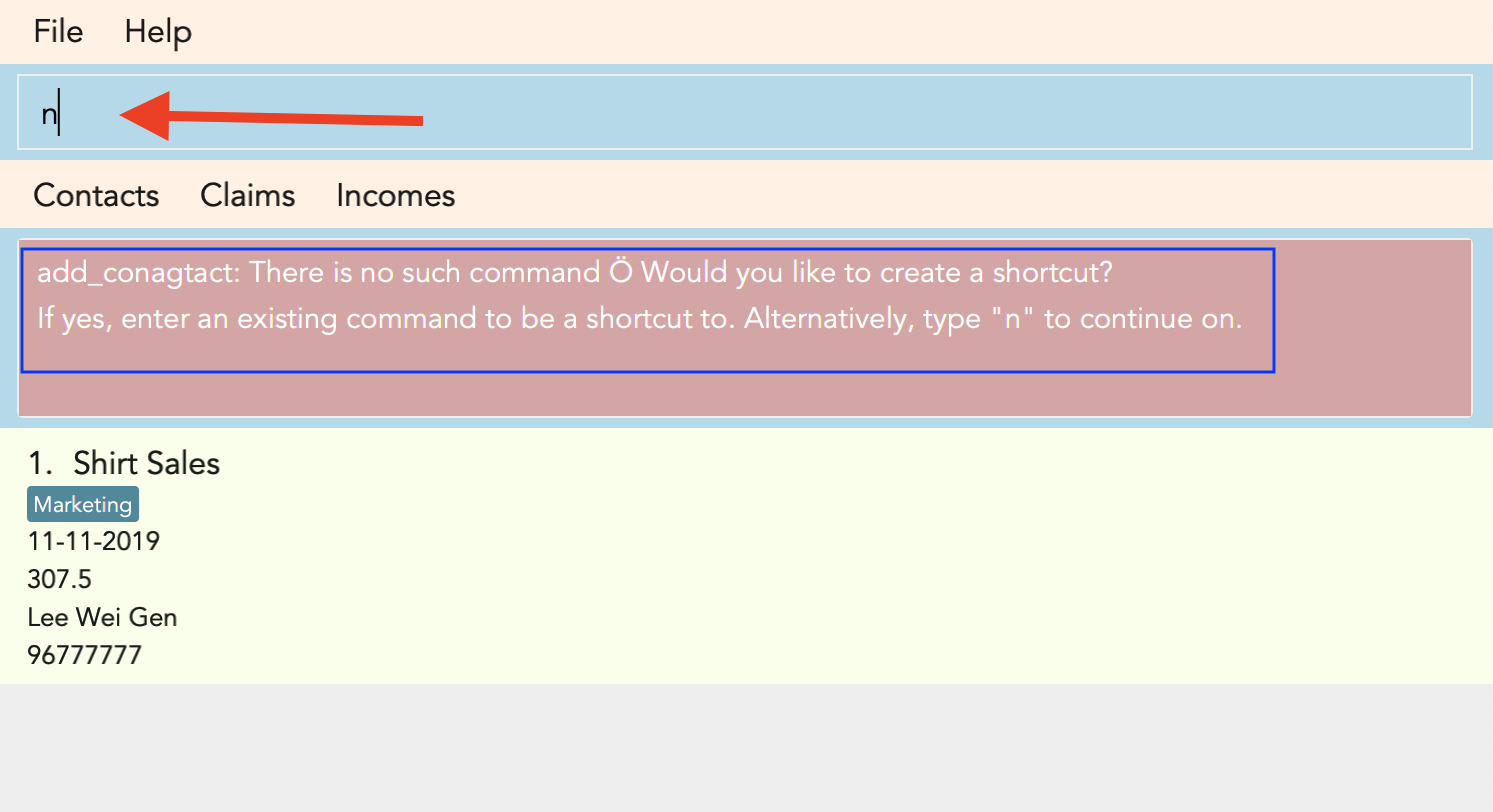
Accidentally typed a command that is not in FinSec? Don’t worry! FinSec will recognise that it is an unknown command and is smart enough to make that unknown entry into a shortcut!
Upon entering an unknown command, FinSec will prompt you as to whether you would like that as a new shortcut or if it was just a mistake.
Choice 1 : You can enter the keyword n to continue as per usual.
Choice 2 : You can enter any existing commands to map your previous entry to it!
If you have made a mistake and entered the wrong command, Choice 1 would allow you to continue.
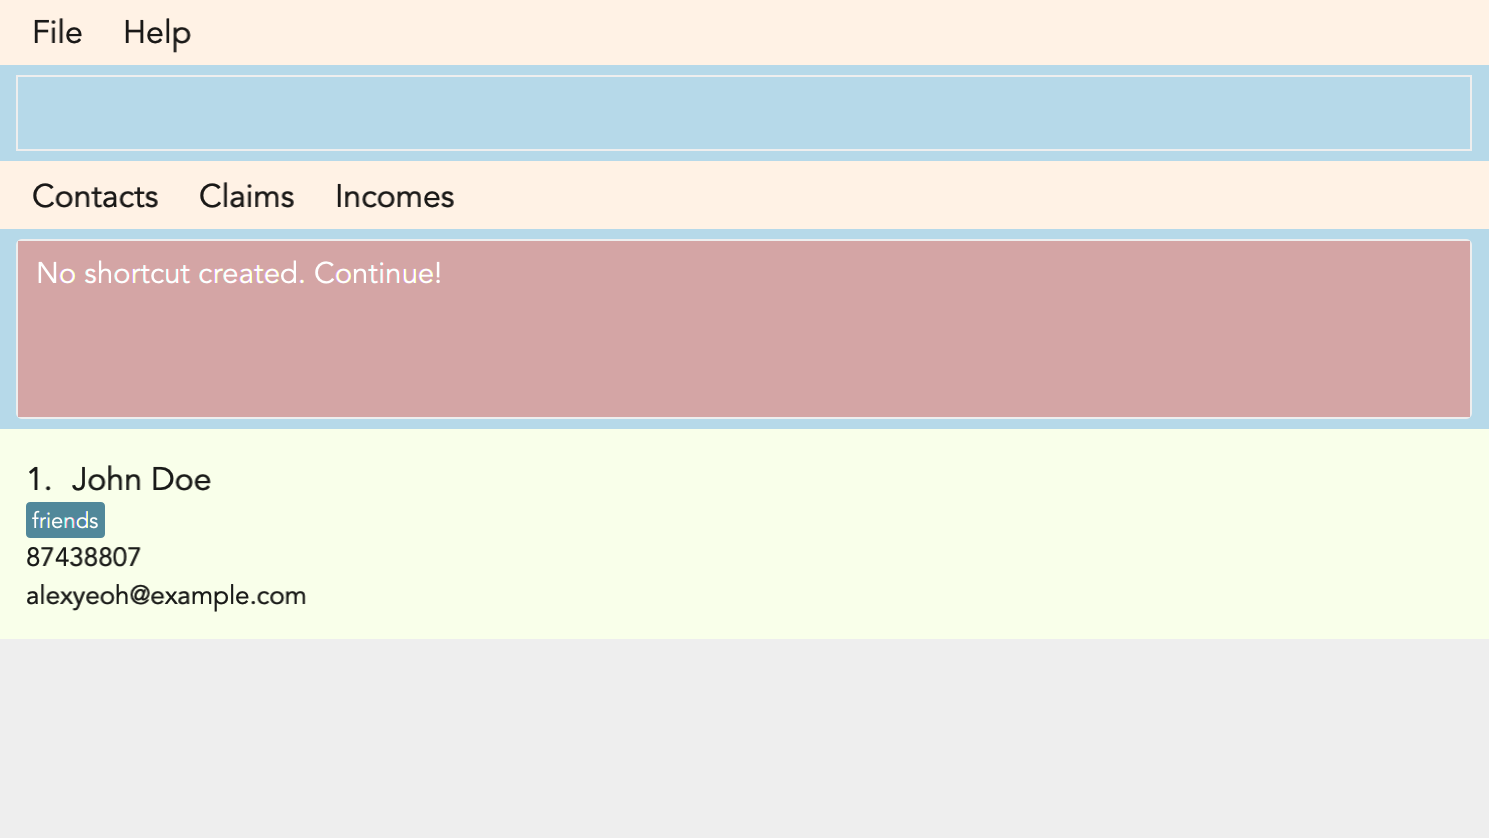
3.10.1. Example of Choice 1 :
Result:
No shortcut is created. Continue using FinSec as per normal!
Figure 3.11.1.1, Figure 3.11.1.2 and Figure 3.11.1.3 shows what you can expect to see after typing in the example: add_conagtact.
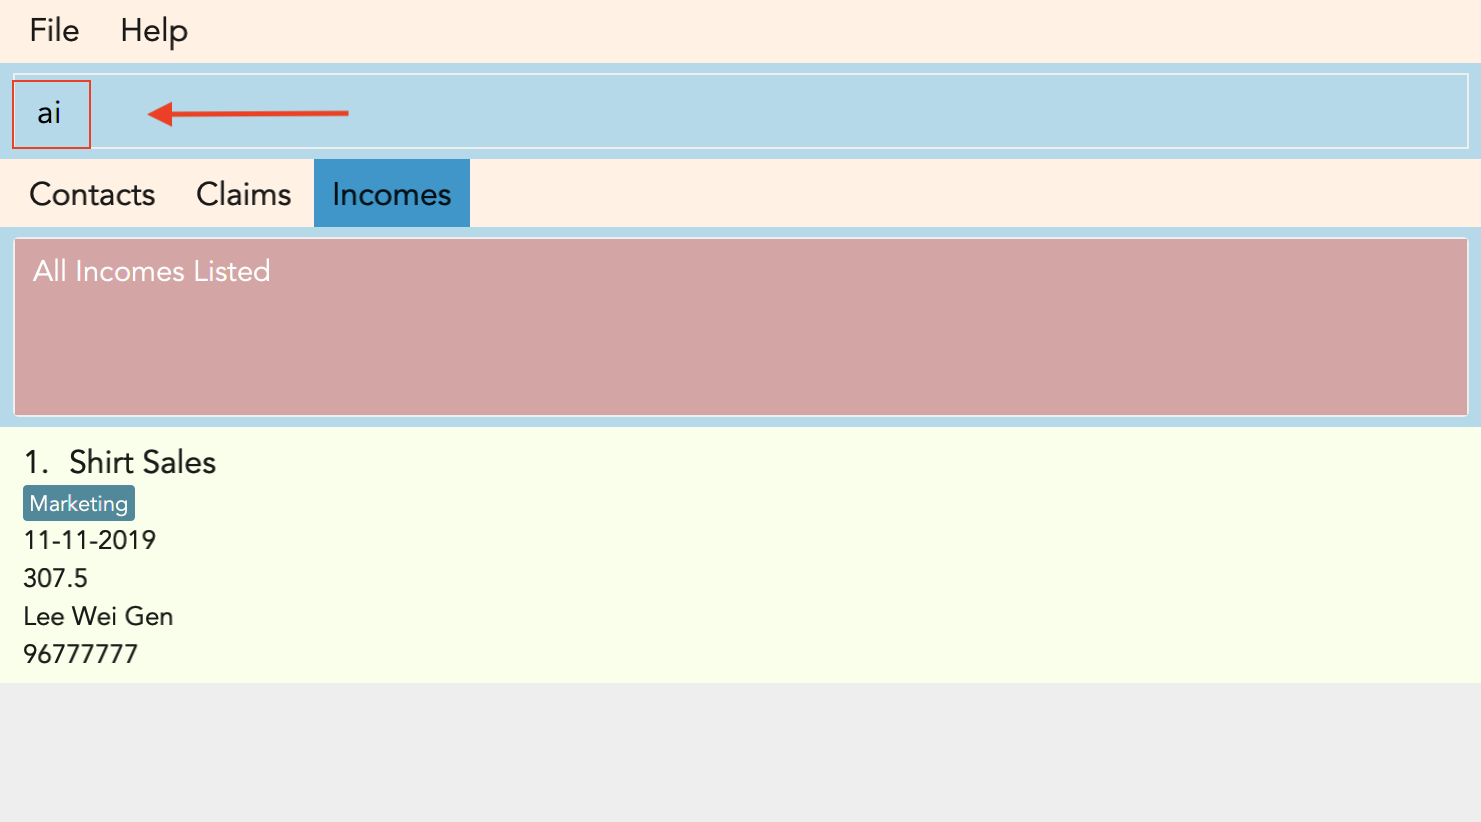
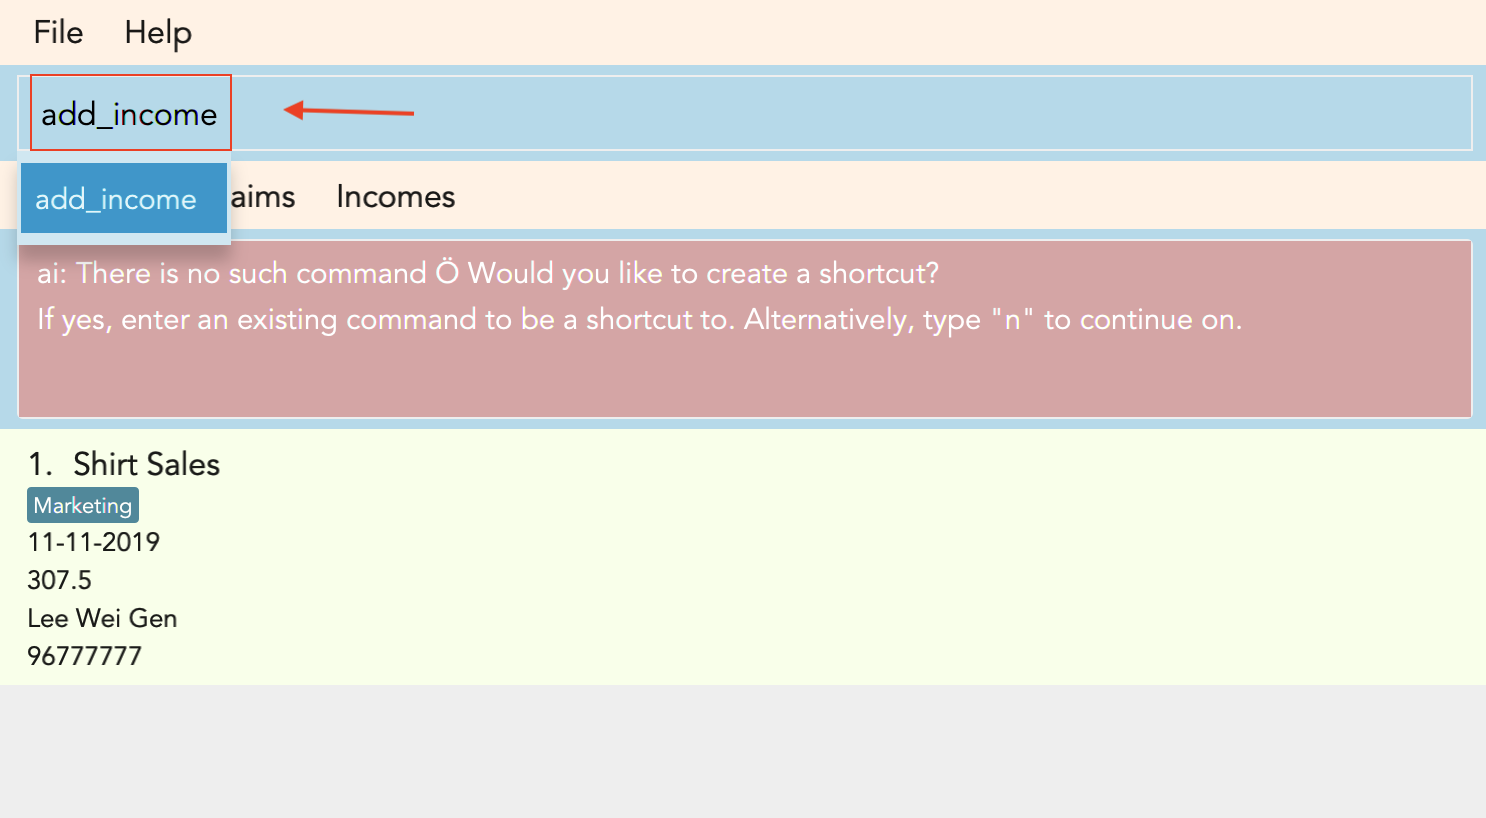
If you have wish to create a shortcut, Choice 2 would allow you to create a shortcut to a command.
3.10.2. Example of Choice 2 :
Result:
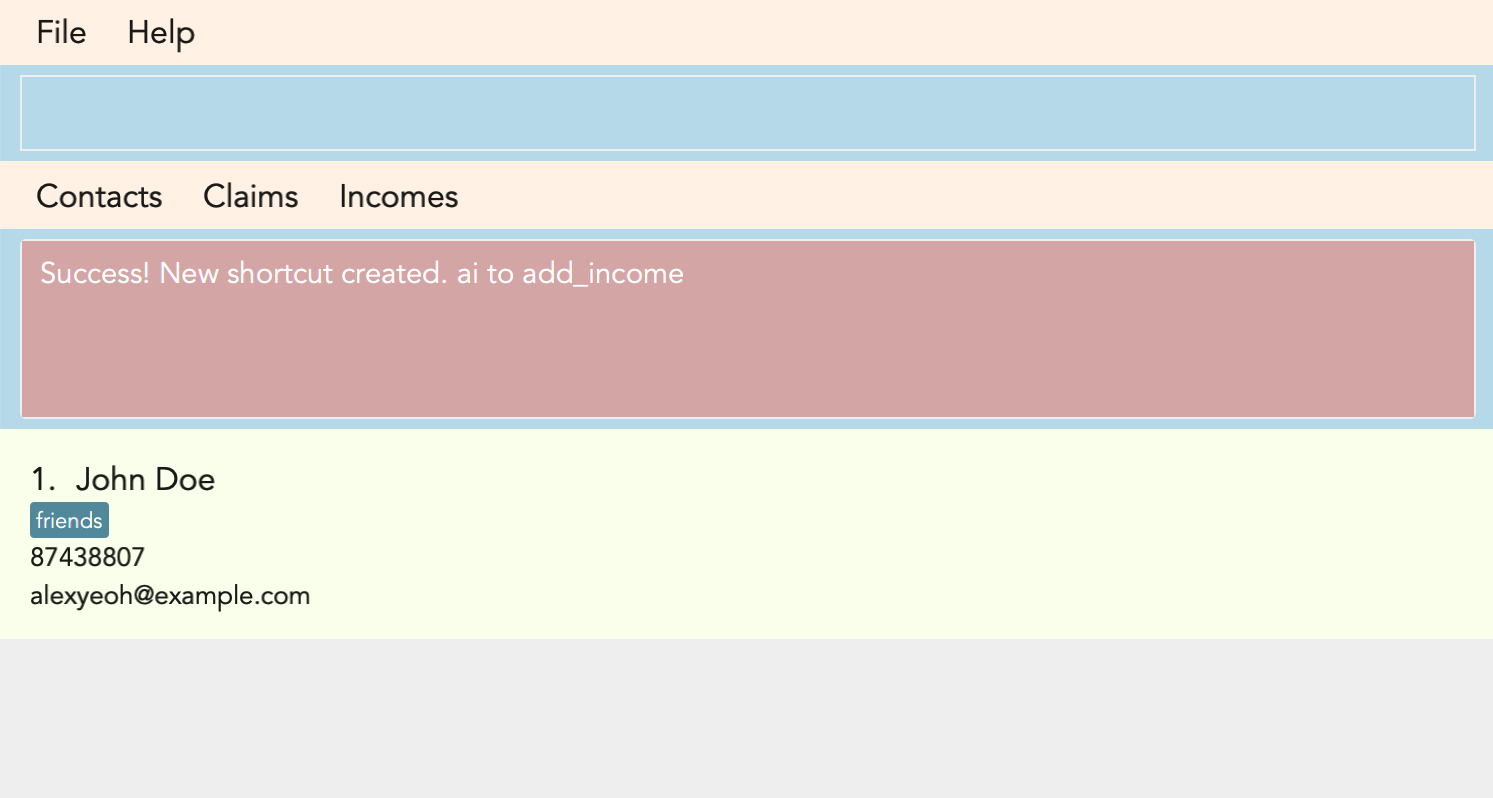
A new shortcut is created for you! From now on, ai can be used as a substitute for add_income!
Figure 3.10.2.1, Figure 3.10.2.2 and Figure 3.10.2.3 shows what you can expect to see when you want to create a shortcut ai as shown in the example.
Warning
-
The shortcut you want to add has to be to a default FinSec command.
3.11. Deleting a shortcut : delete_shortcut
You can delete a shortcut that you have created by using the delete shortcut command by entering the keyword delete_shortcut followed by shortcut name.
The specified shortcut will be then deleted.
Keyword: delete_shortcut
Format: delete_shortcut SHORTCUT
Example:
delete_shortcut ai (removes shortcut 'ai' )
Result:
The shortcut is now no longer available for use.
Warning
-
The shortcut you want to delete has to be an existing shortcut.
-
This will not work for default commands.
The 3 features below are made to be used in conjunction with each other. They are `goto`, `check` and `sort`/`reverse` respectively. They are an implementation of the other objects created in this application. You will be able to use these 3 features smoothly once you have input objects like `claim`, `income` into FinSec. You would then be able to switch between the different "tabs" that we call as `View`. Once you are in the specific `View` that displays the list of objects you created. You can`sort` or `reverse` this list. The list will then be sorted into a more organised manner for you. Once you have sorted the list, you can then use the `check` feature in the `contact` or `claim` View to sieve out a specific contact or claim that interests you. Now that you have gotten a clearer picture of how these 3 features will work together, read on to know more specific details about each feature.
// end::introduction[]
3.12. Changing Views : goto
This command changes the displayed list to show Contacts, Claims or Incomes. Such a command allows you to switch
between the 3 lists easily. This feature has also been enhanced with the addition of tabs below the Command Result panel.
These tabs give the same functionality as this goto feature so that you can choose to type or click on the tabs.
Figure 3.2.1 shows the command result panel after the goto contacts command has been entered
as well as the tabs that are below this panel.
goto commandKeyword: goto
Additional Parameters: claims, contacts, incomes
Format: goto (parameter)
Example:
goto contacts
goto claims
goto incomes
3.13. Checking a Contact or Claim : check
This feature allows you to check an individual Contact or Claim in either lists. This will give you a clearer view of the 2 different objects
that you need. This function in the contacts list will give you a pop-up of the contact and show you the basic details of this
contact and most importantly, the claims that are under this contact.
As for the check in the claims list, it will show you the details of the claim in a pop-up too. There is however a difference that you should take note of:
-
The index used in this check in claims list is actually referring to the claimID of the
claim. -
From the contacts page, you can check the claimIDs that belong to a certain contact that you want to check.
-
You can then go to the claims list and enter
check CLAIMIDwith thisCLAIMIDparameter as the specific claim that you want to see in clearer view.
Keyword: check
Format: check INDEX
Examples:
Checking of a contact in the contacts page:
Step 1: Type check 1 into the command box and press Enter to execute it
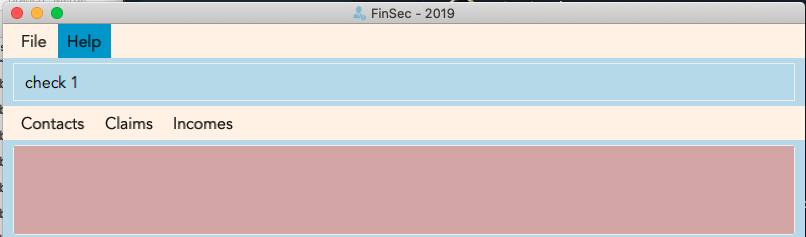
Step 2: The result box will display "Contact Shown"

Step 3: This is the pop-up window that comes up after the command is entered. You are now able to see the claims that belong to this contact
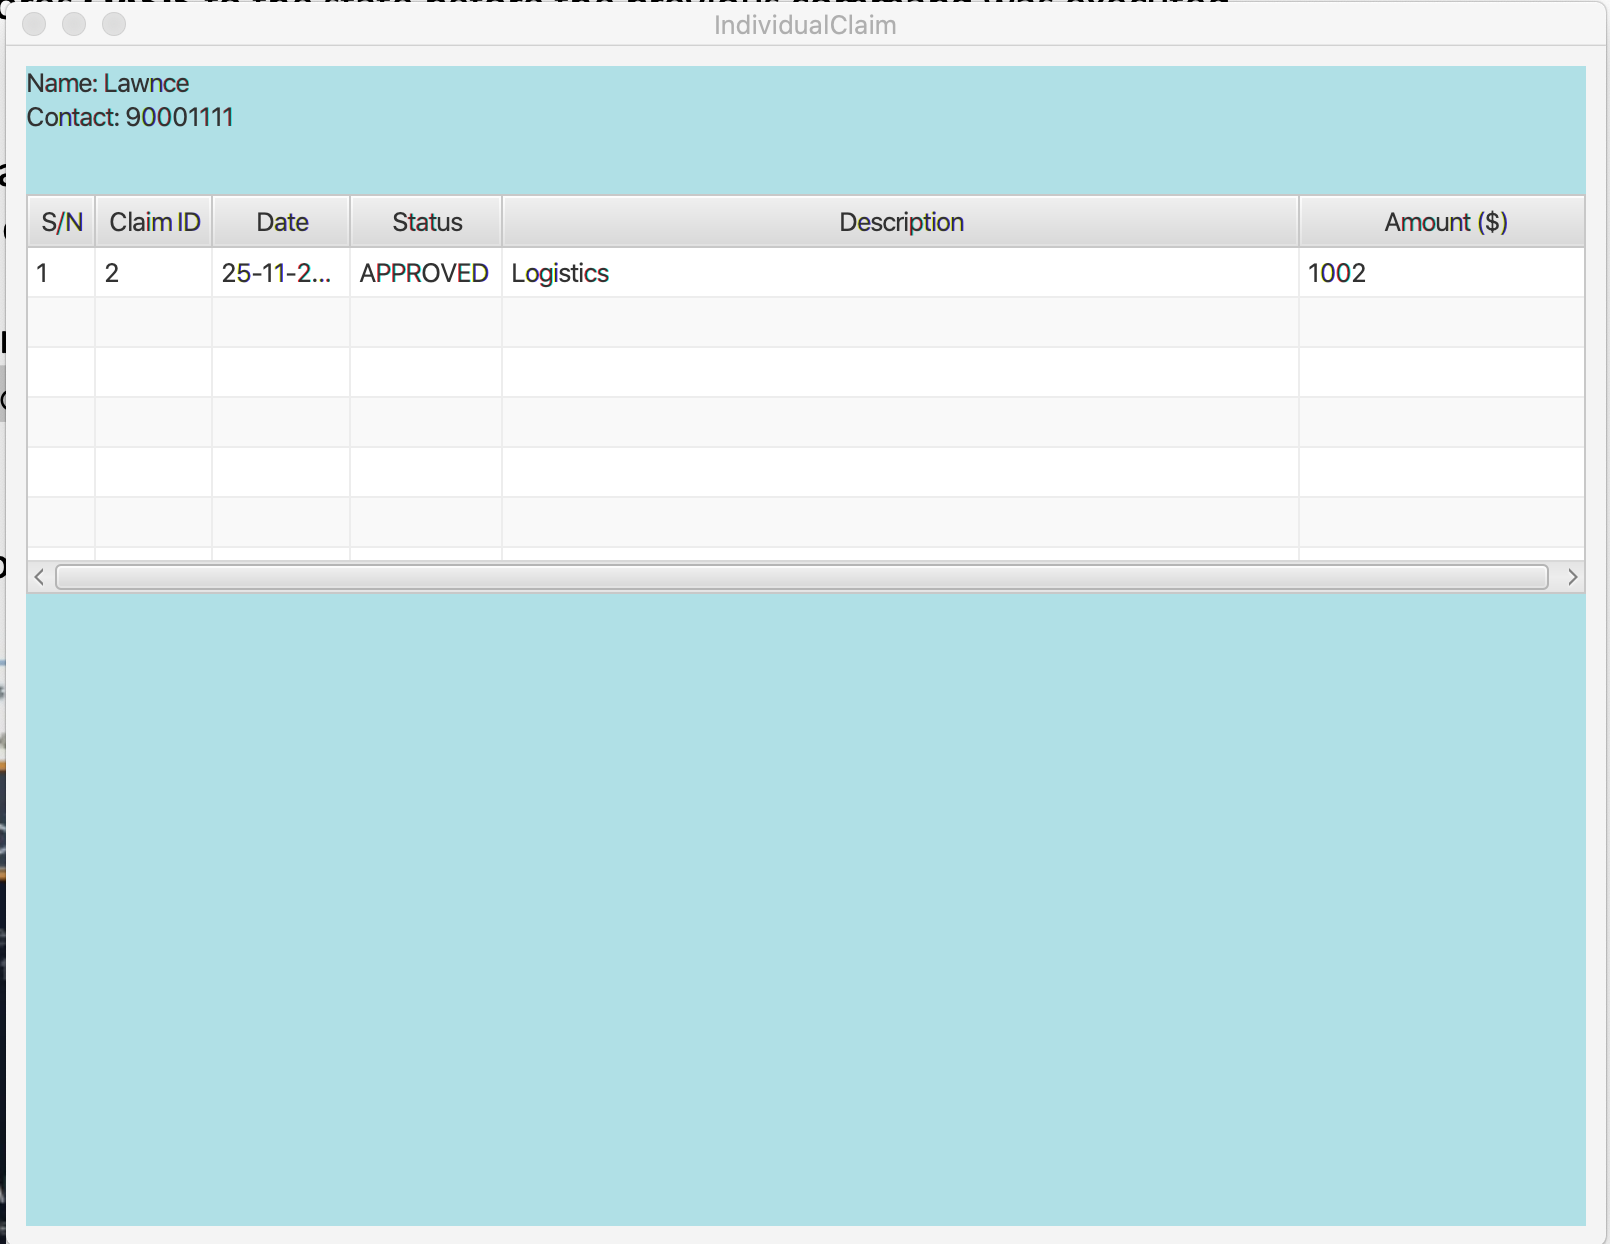
Checking of a claim in the claims page:
Step 1: Type check 2 into the command box and press Enter to execute it. This index 2 represents the claimID
of each individual claim card.

Step 2: The result box will display "Claim Shown"

Step 3: This is the pop-up window that comes up after the command is entered. You are now able to see the important details that belong to this claim.

3.14. Sorting the Contacts/Claims/Incomes list by Contact’s Name
This feature allows you to sort the various lists according to the contact’s name in lexicographical order. The command is the same in all 3 lists and the objects are sorted based on the contact’s name. In Claims, it is the description of the claim. In Incomes, it is the entity who provided the income.
Keyword: sort name
Format: sort name
Examples:
-
sort name
3.15. Sorting the Claims/Incomes list by Date
This feature allows you to sort the various lists according to the date from the oldest to newest entry.
Keyword: sort date
Format: sort date
Warning
sort date doesn’t apply to contacts list
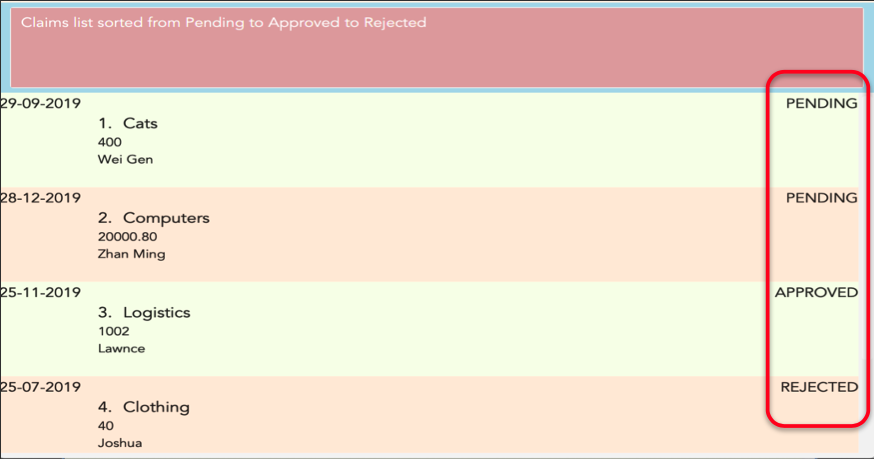
3.16. Sorting the Claims list by Status
This feature allows you to sort the claims list according to the 3 different status. They are mainly APPROVED, REJECTED
and PENDING. Once you enter this command, the claims list will be sorted with PENDING at the top of the list, followed by
APPROVED and lastly REJECTED.
Keyword: sort status
Format: sort status
Warning
sort status only applies to the claims list
Figure 3.15.1 shows what you can expect to see when typing in the sort status command in claims list.
Examples:
* sort date
3.17. Sorting the Contacts/Claims/Incomes list in reverse order
This feature allows you to sort the various lists according to the contact’s name in reverse lexicographical order.
Warning
reverse name in the claims list sorts it by desription of the claims
Keyword: reverse name
Format: reverse name
3.18. Sorting the Claims/Incomes list in reverse order by Date
This feature allows you to sort the various lists according to the date from the newest to oldest entry. This command is not applicable in the contacts' page
Keyword: reverse date
Format: reverse date
Warning
reverse date doesn’t apply to contacts list
3.19. Sorting the Claims list in reverse order by Status
This feature allows you to sort the claims list according to the 3 different status in reverse order.
Once you enter this command, the claims list will be sorted by the reverse of the sort command. The claims
will be sorted as REJECTED at the top, followed by APPROVED then PENDING.
Keyword: reverse status
Format: reverse status
Warning
reverse status only applies to the claims list
3.20. Deleting a Contact : delete_contact
Deletes a Contact from the contact list
Keyword: delete_contact
Format: delete_contact INDEX
Examples:
delete_contact 1 (removes first person in the contact list)
-
Deletes the person at the specified
INDEX. -
The index refers to the index number shown in the displayed person list.
-
The index must be a positive integer 1, 2, 3, …
3.21. Viewing budget : budget
Calculates the projected budget based on all income and approved claim values. It
also displays a graph detailing total income, claim and budget values for every day of the current month.
To view your budget, use the command syntax given below.
Format: budget
Your projected budget is the balance of money you are expected to have after all your expenses from the approved
claims have been subtracted from your income stream.
Figure 3.21.1 below shows what you can expect to see when typing in the budget command.

You will never have to worry about going over budget,
as FinSec will warn you when that happens.
It would also result in a negative balance.
Next up, Figure 3.21.2 below shows the graph portion of the budget command, which shows your
projected income, claim and budget values for the current month.
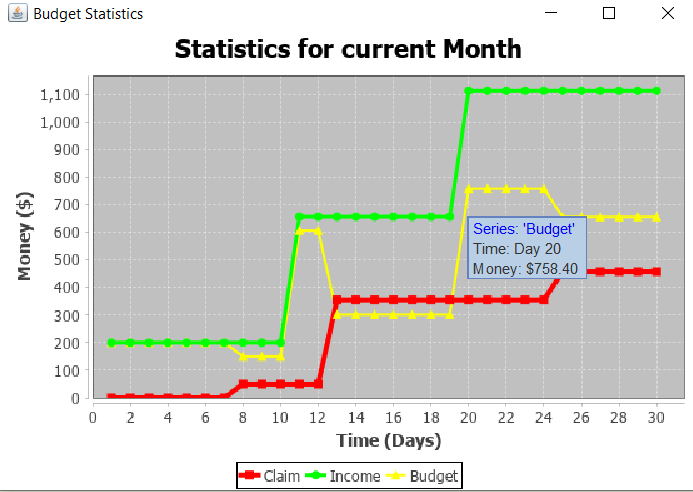
Hovering your mouse pointer over one of the data-points
of any line will cause a tooltip similar to the one
shown in the picture above to pop up.
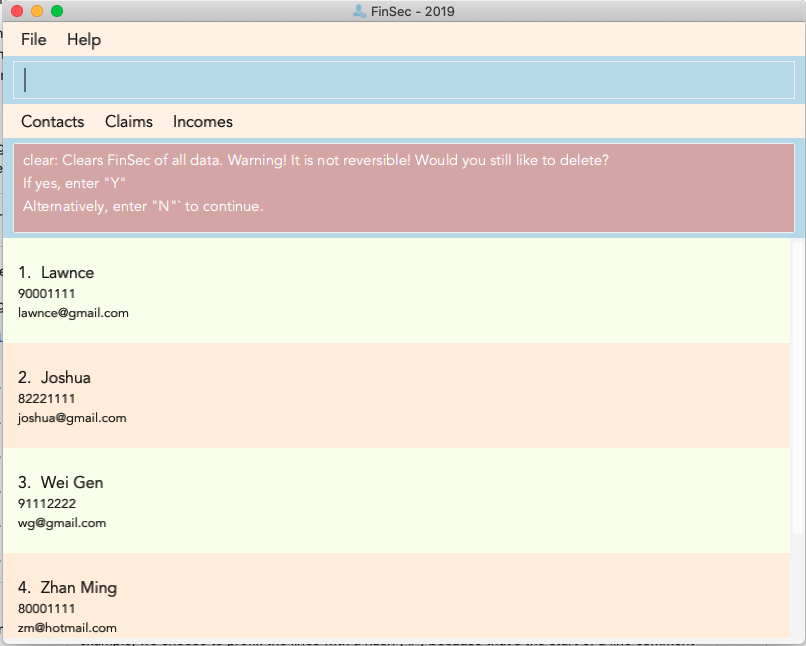
3.22. Clearing all data : clear
This command wipes all data from the FinSec and starts with a new FinSec. This feature is also updated from addressbook
to includes a second prompt function. The application will prompt you with a warning upon entering of the clear command.
The clearing of data will only go through if you type in a Y for the second prompt. The input of N on the second prompt
will abort the clear command. You can then continue with your tasks.
Format: clear
Figure 3.14.1 and Figure 3.14.2 shows what you can expect to see when typing in the clear command.

clear command is confirmed.3.23. Making a mistake : <any invalid entry>
Prompts user on whether he or she would want to create a shortcut as FinSec does not recognise the command.
If the user wishes to create a shortcut with this entry, he would then proceed to type in which commands he would want to create the shortcut for.
If the user does not want to create a shortcut and it is just a typo error, he can enter "n" to continue with his
commands.
Example:
-
AC(FinSec does not recognise the command) -
add_contact(User chooses to create the shortcut for the commandadd_contact) -
The shortcut
ACis created for the commandadd_contact
3.24. Exiting the program : exit
Exits the program.
Format: exit
3.25. Saving the data
Address book data are saved in the hard disk automatically after any command that changes the data.
There is no need to save manually.
4. Non-command Features
4.1. Detecting duplicates
FinSec can automatically detect duplicate names of contacts, claims or incomes.
4.2. Typing Guide
Automatically detects command and comes up with suggestions as a pop-up on what syntax comes next.
5. Upcoming Features (To be implemented in v2.0)
5.1. Attaching Pictures to Claims : attach (To be implemented in v2.0)
Attaches a picture of the claim in the 'docs/claims/images' folder (directory is subject to change) to a claim.
Keyword: attach
Format: attach INDEX
Examples:
-
attach 1
5.2. Checking for months or dates (To be implemented in v2.0)
Checks for the claims or incomes that matches the specific month or date that was typed as input.
Keyword: check
Format: check FILTER
Examples:
-
check november -
check 28/12/2019
5.3. Display statistics of the application (To be implemented in v2.0)
Displays the important statistics that a Finance Secretary need to know. Examples of statistics are:
-
Number of claims in the month
-
Total income received in a certain time period
-
What was the most expensive claim
Keyword: statistics
Format: statistics
5.4. Grouping Users : tag (To be implemented in v2.0)
Assigns tags to the people in the contact list to group them together to aid in finding specific groups of people
Keyword: tag
Format: tag INDEX t/TAG
Examples:
-
tag 1 t/FOP t/Sports
6. FAQ
Q: How do I transfer my data to another Computer?
A: Install the app in the other computer and overwrite the empty data file it creates with the file that contains the data of your previous Address Book folder.
7. Command Summary
-
Requesting Help :
help cmd/COMMAND type/TYPE
e.g.help cmd/add_income type/brief -
Changing of Views
goto (parameter)e.g.goto claims -
Adding Contacts
add_person n/NAME p/PHONE_NUMBER e/EMAIL [t/TAG]…
e.g.add_contact n/James Ho p/22224444 e/jamesho@example.com a/123, Clementi Rd, 1234665 t/friend t/colleague -
Editing Contacts :
edit INDEX [n/NAME] [p/PHONE_NUMBER] [e/EMAIL] [t/TAG]
e.g.edit_contact 2 d/Sports Equipment a/115.2 n/Lee Wei Gen p/96777777 t/Sports -
Adding Claims
add_claim d/DESCRIPTION_OF_CLAIM a/AMOUNT n/PERSON_NAME [t/TAG]
e.g.add_claim d/Sports Equipment a/115.2 n/Lee Wei Gen t/Sports -
Approving Claims
approve INDEX
e.g.approve 1 -
Rejecting Claims
reject INDEX
e.g.reject 1 -
Adding Incomes
add_income d/DESCRIPTION_OF_INCOME a/AMOUNT n/PERSON_NAME p/PHONE_NUMBER [t/TAG]
e.g.add_income d/Shirt Sales a/307.5 n/Lee Wei Gen p/96777777 t/Marketing -
Editing Incomes
edit_income INDEX d/DESCRIPTION_OF_INCOME a/AMOUNT n/PERSON_NAME p/PHONE_NUMBER [t/TAG]
e.g.edit_income 2 d/Camp Fees a/1150.50 n/Lee Wei Gen p/96777777 t/FOP -
Checking Person or Claim
check INDEX
e.g.-
check 1(in contacts page, show details of the person in index 1) -
check 2(in claims page, show details of the claim in index 2)
-
-
Deleting Contacts
delete_contact INDEX
e.g.delete_contact 3 -
Sorting Lists
sort
e.g.-
sort name -
sort date -
sort status(only in Claims List)
-
-
Sorting Lists in reverse order
reverse
e.g.-
reverse name -
reverse date -
reverse status(only in Claims List)
-
-
Viewing Budget
budget -
Resolving Claims
resolve INDEX s/STATUS
e.g.-
resolve 1 s/approved (in claims page, approve a claim) -
resolve 2 s/rejected (in claims page, reject a claim)
-
-
Attaching Pictures to Claims
attach INDEX(To be implemented in v2.0)
e.g.attach 1 -
Grouping Users
tag INDEX t/TAG(To be implemented in v2.0)
e.g.tag 1 t/FOP t/Sports -
Closing application
exit