Overview

[github]
Hi! My name is Lawnce. I am a second year student in School of Computing. This page aims to document the contributions I have made in a project that my team and I completed for the module CS2103T.
My team was tasked to enhance the existing Command Line Interface application the module provided us with. We decided to morph the application into a Financial Tracker for Finance Secretaries in organisations. This new application, FinSec, allows for these Finance Secretaries to easily store their claims requests, income inflows and keep track of budget accurately. On top of these, the secretary can store the contacts of all the people who have made transactions with him so that it ensures easier tracking in the future.
Role
My primary role in the project was to implement the Goto, Sort, Check features. I also enhanced the existing Clear Feature. Lastly, I was in charge of the scheduling and tracking throughout the project, ensuring that deadlines were met.
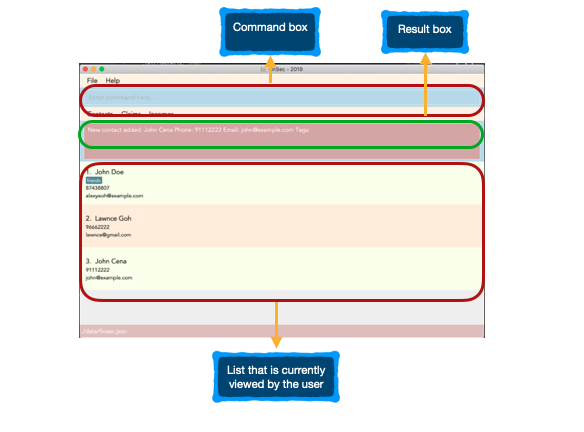
This is the Main Window of our project:
Summary of contributions
This section is a summary of my contributions to the project. I have 3 major enhancements and 1 minor enhancement in total. They are as follows:
-
Major enhancement 1: I added ability to
gotoa different view, through the different lists-
What it does: This
gotofeature allows the user to get to the different lists, namely: contacts, claims and incomes, changing the state at which the user is currently at -
Justification: This feature is the backbone of my next 2 features because the changing of state is the underlying flag or checker that ensures that these 3 features will work correctly in the 3 different lists.
-
Highlights: This enhancement works well with the current UI design as I created 3 tabs to fit with the current File and Help tabs. These tabs are added functions to allow the user to click to
gotoother lists if he/she wants to. The tabs become an extra option for the user to do the same thing. The implementation was also challenging because AB3 only recognised 1 list and that was contacts list. Therefore I not only needed to ensure that the app runs with more than 1 list, but also to ensure that this list is able to update to another list when the correct command is entered. Also, after implementing the changing of lists, I had to also implement a state in each of these lists to make sure that the state changes when a certain view is input as parameter into thisgotofeature.
-
-
Major enhancement 2: I added ability to
sortandreversethe 3 various lists-
What it does: The user is able to sort the lists according to name, date and status.
reverseon the other hand sorts the lists in the reverse order. This is where the states of the various lists will allow this sort feature to work differently. An example will be in the state of claims. Only thesort statusandreverse statuswill work as status belongs only to claim. -
Justification: The user can now sort the claims based on the most critical ones which are the pending claims. The
reversefeature also gives the user the flexibility to see the claims based on what he already approved. As for thedateandnameparameters, they help the user filter through the specific date or name that he/she wants to find. -
Highlights: This enhancement is extremely useful in comparison to the usual paper-filed version of claims or incomes stored in a physical file for a Financial Secretary. The user can now search through the lists for his pending, approved or rejected claims with much more ease now they are filed automatically with just 1 command. He can even find the oldest claim or income inflow that he had with just another command. The implementation was also challenging because I had to come up with different comparators for the different parameters as well as for
reversetoo which sorts the list in the reverse order of whatever parameter is typed. I had to consider what was most important for the user. An example is that I chose to sort the claims list by the description of the claims when the user inputssort name. A Financial Secretary would be more likely to need the description of the claims when he wants to check through his claims.
-
-
Major enhancement 3: I added the ability to
checkeach individual claim or contact-
What it does: The
checkfeature allows the user to see the claims and details that are linked to the this current contact in the contacts page. In the claims page, the check feature allows the user to view a single claim with the most important details on this card. Both are shown through a pop-up to show the individual contact or claim. This feature once again makes use of the change of state in the goto feature to ensure that the check works differently in both contacts or claims list. -
Justification: Once you have gone to the list of your choice and sorted it, this feature will retrieve the exact claim or contact that is of interest to the user in a pop-up that cancels out all interference from the other items. The check in the contacts list will allow the user to see the specific claims that are linked to this contact and see the details that tag along with it.
-
Highlights: This feature works extremely well with the above 2 features as well as for future implementations. Further implementations can include directly going to the specific from the list of claims that pops up during the checking of contact in the contacts' list. Another implementation can be the ability to pop up the claims that are of a certain date or status. If the sorting system in the feature is not enough for the user. This example of
check November/2019orcheck Pendingin the claims list will give a user-friendly pop up of the filtered claims and display it clearly to the user.
-
-
Minor enhancement 1: I tweaked the
clearfeature in the existing AB3 to ensure that before the user is able to clear the list, the application prompts the user one more time to ensure that the command was not by accident. -
Code contributed: [Code]
-
Other contributions:
-
Project management:
-
Enhancements to existing features:
-
Updated the mock up for UI of product (Commit 560d7bdc3c9e4ea835285441bc7cc013f6f90ab2)
-
Updated the UI of the whole application to suit our general theme of a more pastel-coloured application to allow the user to feel comfortable using it
-
Wrote additional tests for existing features to increase coverage from 49% to 53%. 529 and from 57% to 60%. 561
-
-
Documentation:
-
Fixed the formatting of the developer guide and made major changes to my own section: 143
-
-
Community:
-
Tool:
-
Integrated coveralls to the project
-
-
Contributions to the User Guide
Given below are sections I contributed to the User Guide. The following is an excerpt from our FinSec User Guide, showing additions that I have
made for |
The 3 features below are made to be used in conjunction with each other. They are `goto`, `check` and `sort`/`reverse` respectively. They are an implementation of the other objects created in this application. You will be able to use these 3 features smoothly once you have input objects like `claim`, `income` into FinSec. You would then be able to switch between the different "tabs" that we call as `View`. Once you are in the specific `View` that displays the list of objects you created. You can`sort` or `reverse` this list. The list will then be sorted into a more organised manner for you. Once you have sorted the list, you can then use the `check` feature in the `contact` or `claim` View to sieve out a specific contact or claim that interests you. Now that you have gotten a clearer picture of how these 3 features will work together, read on to know more specific details about each feature.Changing Views : goto
This command changes the displayed list to show Contacts, Claims or Incomes. Such a command allows you to switch
between the 3 lists easily. This feature has also been enhanced with the addition of tabs below the Command Result panel.
These tabs give the same functionality as this goto feature so that you can choose to type or click on the tabs.
Figure 3.2.1 shows the command result panel after the goto contacts command has been entered
as well as the tabs that are below this panel.

goto commandKeyword: goto
Additional Parameters: claims, contacts, incomes
Format: goto (parameter)
Example:
goto contacts
goto claims
goto incomes
Sorting the Contacts/Claims/Incomes list by Contact’s Name
This feature allows you to sort the various lists according to the contact’s name in lexicographical order. The command is the same in all 3 lists and the objects are sorted based on the contact’s name. In Claims, it is the description of the claim. In Incomes, it is the entity who provided the income.
Keyword: sort name
Format: sort name
Examples:
-
sort name
Sorting the Claims/Incomes list by Date
This feature allows you to sort the various lists according to the date from the oldest to newest entry.
Keyword: sort date
Format: sort date
Warning
sort date doesn’t apply to contacts list
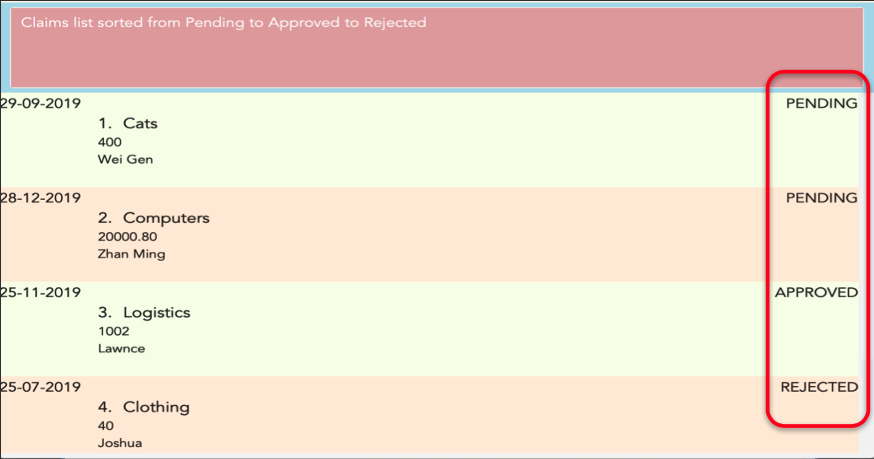
Sorting the Claims list by Status
This feature allows you to sort the claims list according to the 3 different status. They are mainly APPROVED, REJECTED
and PENDING. Once you enter this command, the claims list will be sorted with PENDING at the top of the list, followed by
APPROVED and lastly REJECTED.
Keyword: sort status
Format: sort status
Warning
sort status only applies to the claims list
Figure 3.15.1 shows what you can expect to see when typing in the sort status command in claims list.
Examples:
* sort date
Checking a Contact or Claim : check
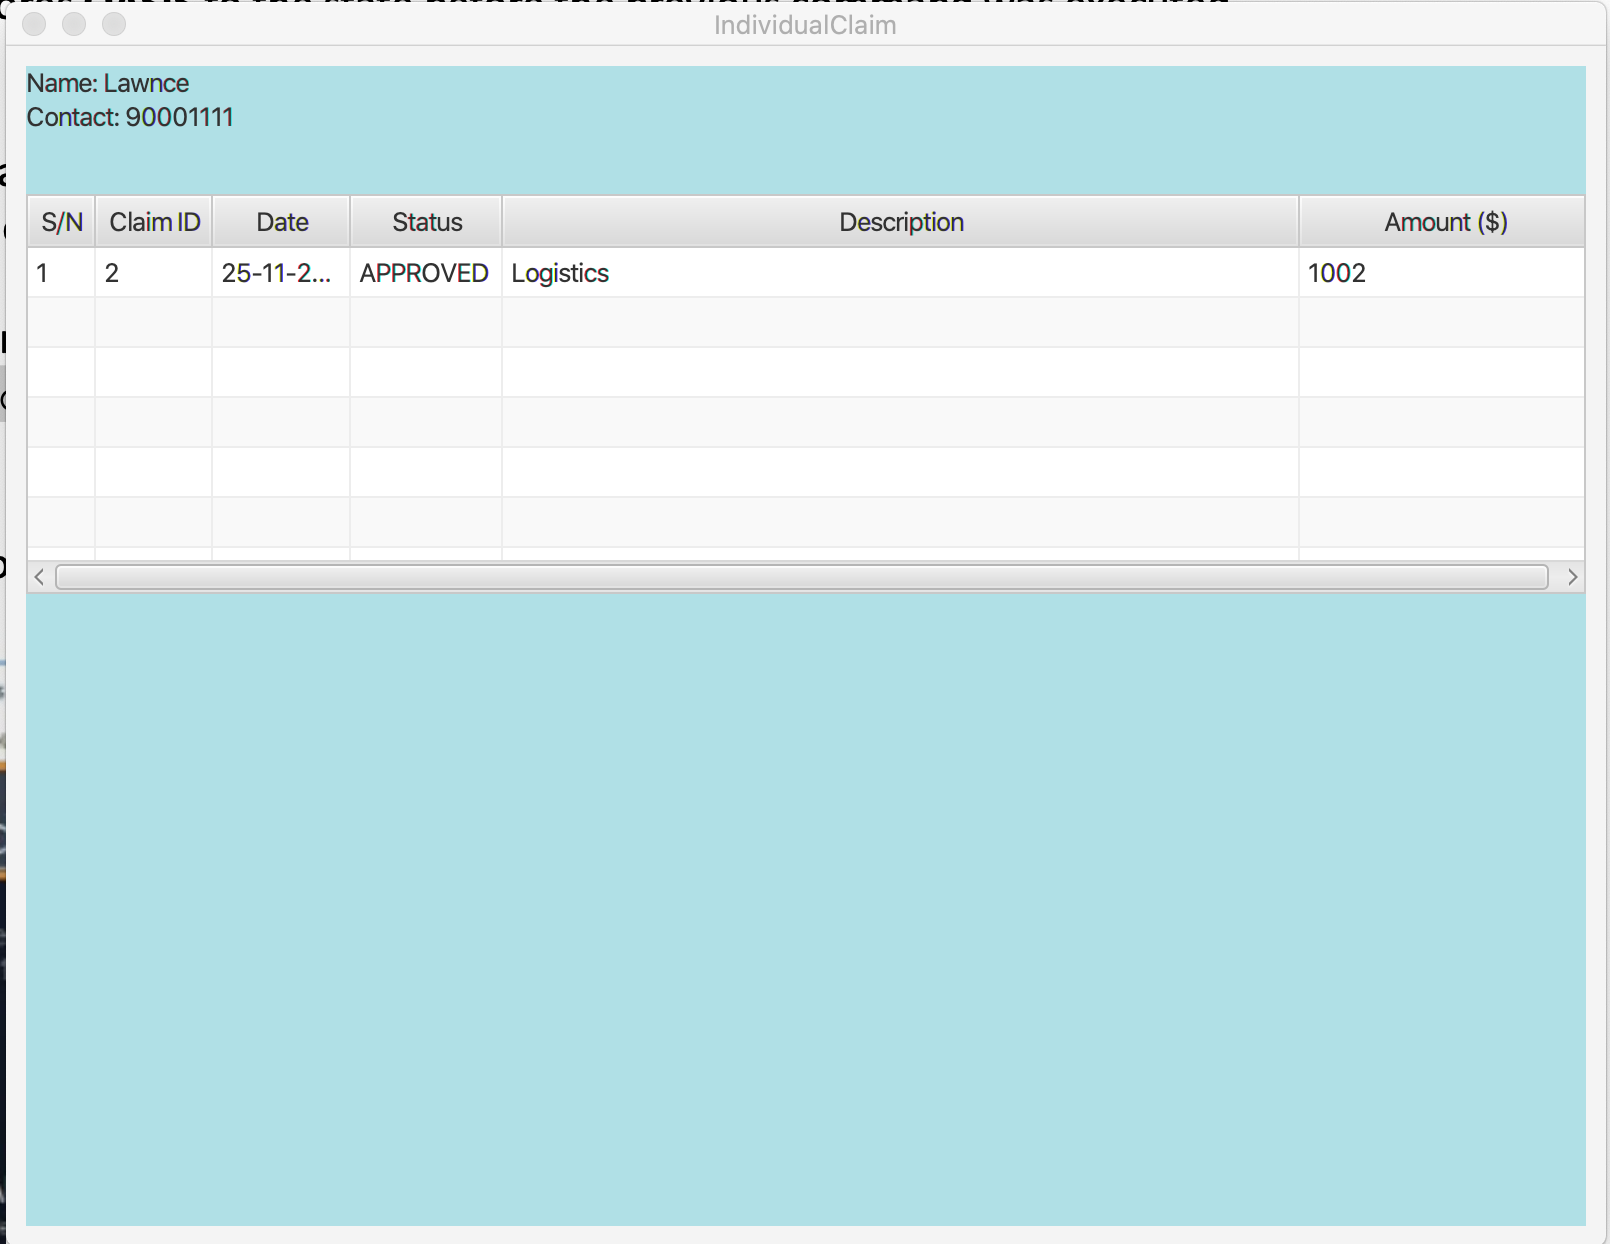
This feature allows you to check an individual Contact or Claim in either lists. This will give you a clearer view of the 2 different objects
that you need. This function in the contacts list will give you a pop-up of the contact and show you the basic details of this
contact and most importantly, the claims that are under this contact.
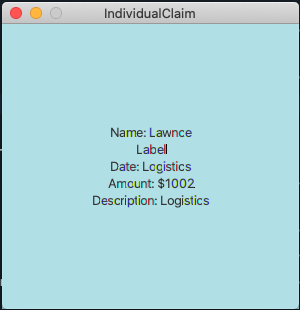
As for the check in the claims list, it will show you the details of the claim in a pop-up too. There is however a difference that you should take note of:
-
The index used in this check in claims list is actually referring to the claimID of the
claim. -
From the contacts page, you can check the claimIDs that belong to a certain contact that you want to check.
-
You can then go to the claims list and enter
check CLAIMIDwith thisCLAIMIDparameter as the specific claim that you want to see in clearer view.
Keyword: check
Format: check INDEX
Examples:
Checking of a contact in the contacts page:
Step 1: Type check 1 into the command box and press Enter to execute it

Step 2: The result box will display "Contact Shown"

Step 3: This is the pop-up window that comes up after the command is entered. You are now able to see the claims that belong to this contact
Checking of a claim in the claims page:
Step 1: Type check 2 into the command box and press Enter to execute it. This index 2 represents the claimID
of each individual claim card.

Step 2: The result box will display "Claim Shown"

Step 3: This is the pop-up window that comes up after the command is entered. You are now able to see the important details that belong to this claim.
Checking for months or dates (To be implemented in v2.0)
Checks for the claims or incomes that matches the specific month or date that was typed as input.
Keyword: check
Format: check FILTER
Examples:
-
check november -
check 28/12/2019
Display statistics of the application (To be implemented in v2.0)
Displays the important statistics that a Finance Secretary need to know. Examples of statistics are:
-
Number of claims in the month
-
Total income received in a certain time period
-
What was the most expensive claim
Keyword: statistics
Format: statistics
Contributions to the Developer Guide
Given below are sections I contributed to the Developer Guide. The following is an except from our FinSec Developer guide, showing additions that
I have made for |
Sort Feature
This section describes the ways that a user can sort the various lists. An overview is also included on how these sorts work. It also provides some design considerations to give users an insight of how the current solutions are worked out.
Overview
There are 2 ways that a user can sort the lists by. It gives the user flexibility in how he wants to see the lists. In addition, after sorting, the user can then employ the check method once again to see each individual object.
Current Implementation
The sort command takes in a 1 parameter that is the Filter. This Filter can either be name or date.
name filter works in all 3 lists. However, in contacts and incomes list, the name filter refers to the name of
the contact and in claims list, name refers to the description of the claim.
date filter works in claims and incomes list and not in contacts list because contacts are not created
with a date.
1) The 2 parameters after the sort command in the user input are name and date
2) This command is then parsed in the same way as the rest of the commands
3) The Activity Diagram below shows the SortCommand::execute method
Figure 2.7.2.1 is the activity diagram of the check command
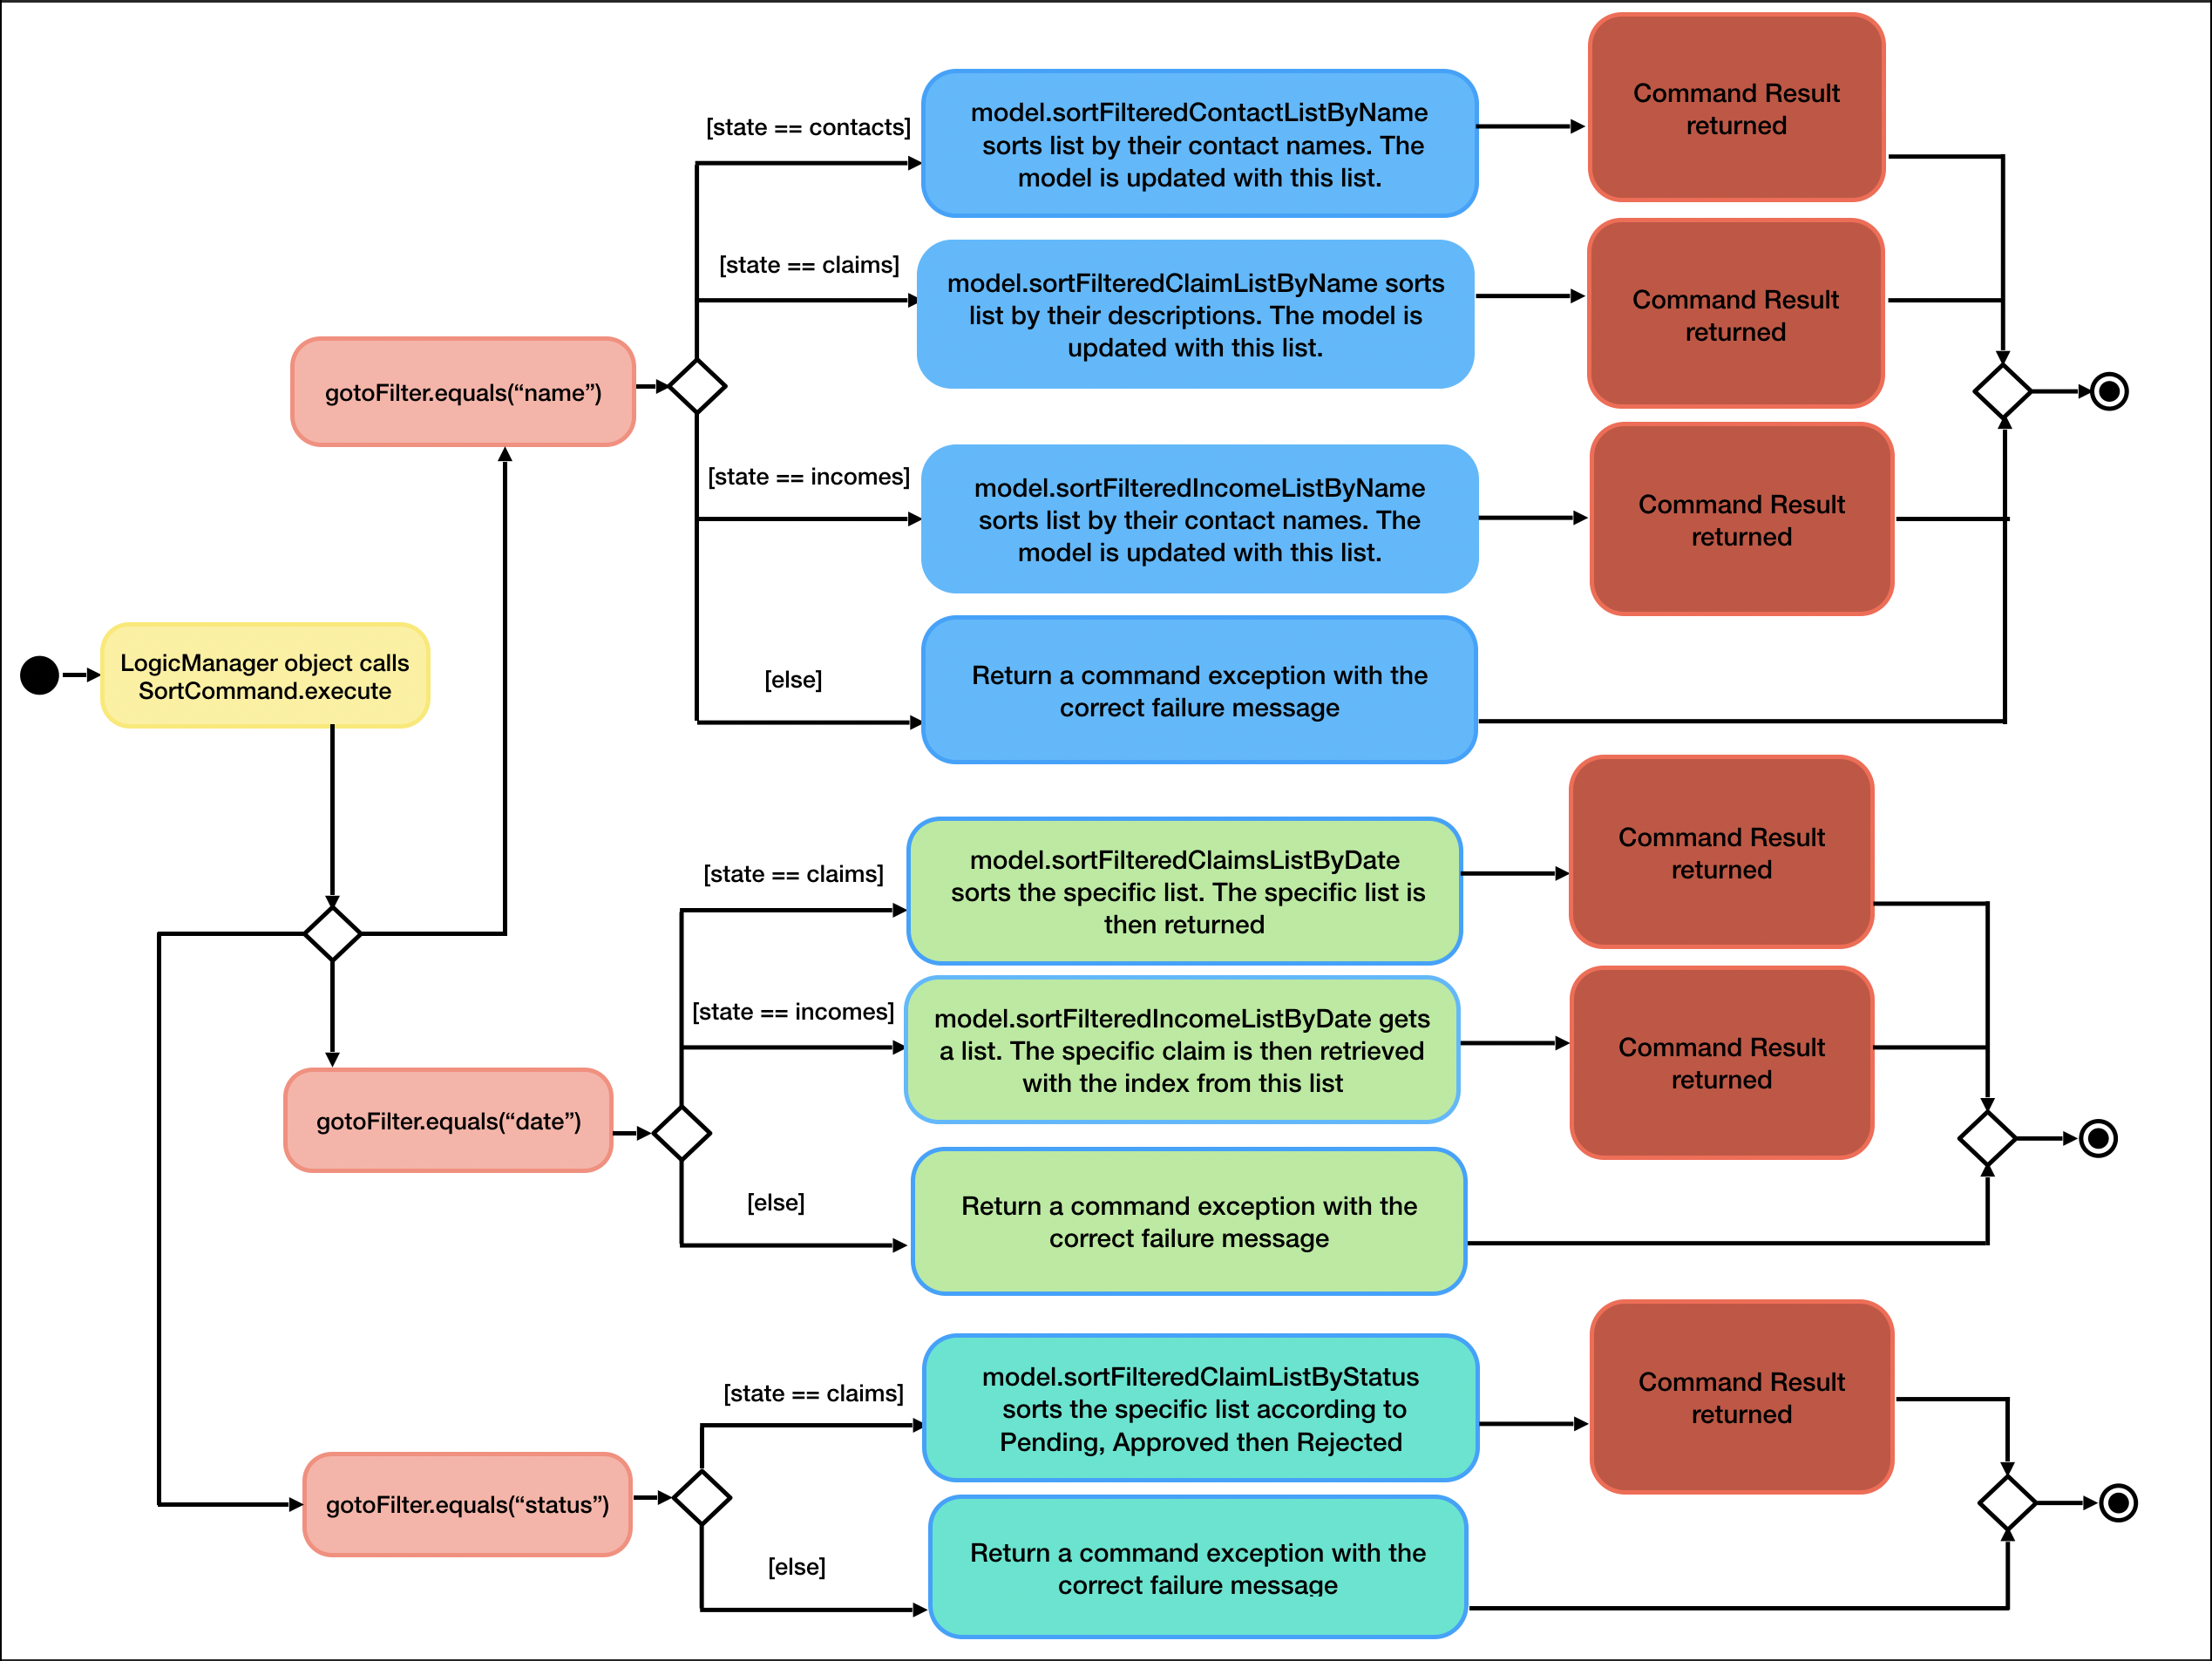
4) To elaborate, once the sort command is called, UiManager::getState method is called to determine the current view
the application is on then implements the correct type of sort on the list.
5) The comparators shown below are examples of the various lists are sorted.
-
sortFilteredClaimListByNameis implemented with the help of a comparator that compares the descriptions of each claim withclaim.getDescription()method. The code snippet below illustrates the comparator.
class ClaimNameComparator implements Comparator<Claim> {
    @Override
    public int compare(Claim claim1, Claim claim2) {
        return claim1.getDescription().toString().toUpperCase()
                .compareTo(claim2.getDescription().toString().toUpperCase());
    }
}-
sortFilteredIncomeListByDateis implemented with the help of a comparator that compares the dates of each income withincome.getDate().getLocalDate()method. The code snippet below illustrates the comparator.
class IncomeDateComparator implements Comparator<Income> {
    @Override
    public int compare(Income income1, Income income2) {
        return income1.getDate().getLocalDate()
                .compareTo(income2.getDate().getLocalDate());
    }
}-
sortFilteredClaimListByStatusis implemented with the help of a comparator that compares the statuses of each claim. The order is as such: Pending, Approved, Rejected. There are 9 cases of comparison between 2 claims. The code snippet below illustrates the comparator.
class ClaimStatusComparator implements Comparator<Claim> {
    @Override
    public int compare(Claim claim1, Claim claim2) {
        if (claim1.getStatus().equals(Status.PENDING) && claim2.getStatus().equals(Status.APPROVED)) {
            return -1;
        } else if (claim1.getStatus().equals(Status.PENDING) && claim2.getStatus().equals(Status.PENDING)) {
            return 0;
        } else if (claim1.getStatus().equals(Status.PENDING) && claim2.getStatus().equals(Status.REJECTED)) {
            return -1;
        } else if (claim1.getStatus().equals(Status.APPROVED) && claim2.getStatus().equals(Status.REJECTED)) {
            return -1;
        } else if (claim1.getStatus().equals(Status.APPROVED) && claim2.getStatus().equals(Status.APPROVED)) {
            return 0;
        } else if (claim1.getStatus().equals(Status.APPROVED) && claim2.getStatus().equals(Status.PENDING)) {
            return 1;
        } else if (claim1.getStatus().equals(Status.REJECTED) && claim2.getStatus().equals(Status.PENDING)) {
            return 1;
        } else if (claim1.getStatus().equals(Status.REJECTED) && claim2.getStatus().equals(Status.REJECTED)) {
            return 0;
        } else if (claim1.getStatus().equals(Status.REJECTED) && claim2.getStatus().equals(Status.APPROVED)) {
            return 1;
        } else {
            return 0;
        }
    }
}
Why was it implemented this way?
The major implementation difference for claims list sorted by name, it is sorted based on the description of each
claim. This was implemented like this because of the check feature. The check feature in the contacts list allows
the user to see what claims are under the user. When a user is in the claims page, he/she will only need to sort based
on descriptions to prevent redundant information through different commands.
The 2 different filters allow the user to be able to look through the lists based on what is important to him/her. date
filter is especially important so the user can check what are the latest or oldest claims. name filter helps the user
find the various contacts/claims/incomes. It doubles up as a find or filter function to let the user find the specific
object he/she is finding.
Design Considerations
-
Sorting of the claims list based on description
-
Advantage: Easily find the claim you are looking for
-
Disadvantage: Might be difficult to remember the names of each claim
-
-
Sorting of the claims list based on contact’s name instead
-
Advantage: Easy to know as the person’s name is probably easier to remember than the claim’s description
-
Disadvantage: Already done in check contact, where you can filter the claims of a certain contact through the
checkfeature
-
Check feature
This feature is an extended feature of the goto feature because this feature can only be run when the user is in the claims or contacts page. This command is called when the user wants to check each contact or claim individually.
Overview
Just like the Goto Command, there are various message attributes: MESSAGE_SUCCESS_CONTACT, MESSAGE_SUCCESS_CLAIM, MESSAGE_FAILURE,
MESSAGE_USAGE that informs the user if the check command was successfully executed and if so which individual pop-up is showing. The 2 lists
that will benefit from these are the contacts and claims list. It is to allow the user to see a clear and concise understanding of the
individual claim or contact. It comes in the form of a pop-up that shows the most important attributes that belong to the claim or contact.
Current Implementation
The check command takes in a single parameter that is the Index.
Figure 2.5.2.1 is a sequence of steps that illustrates the interaction between various classes when the check command is entered.
Figure 2.5.2.1 is a sequence of steps that illustrates the interaction between various classes when the check 1
command is entered.
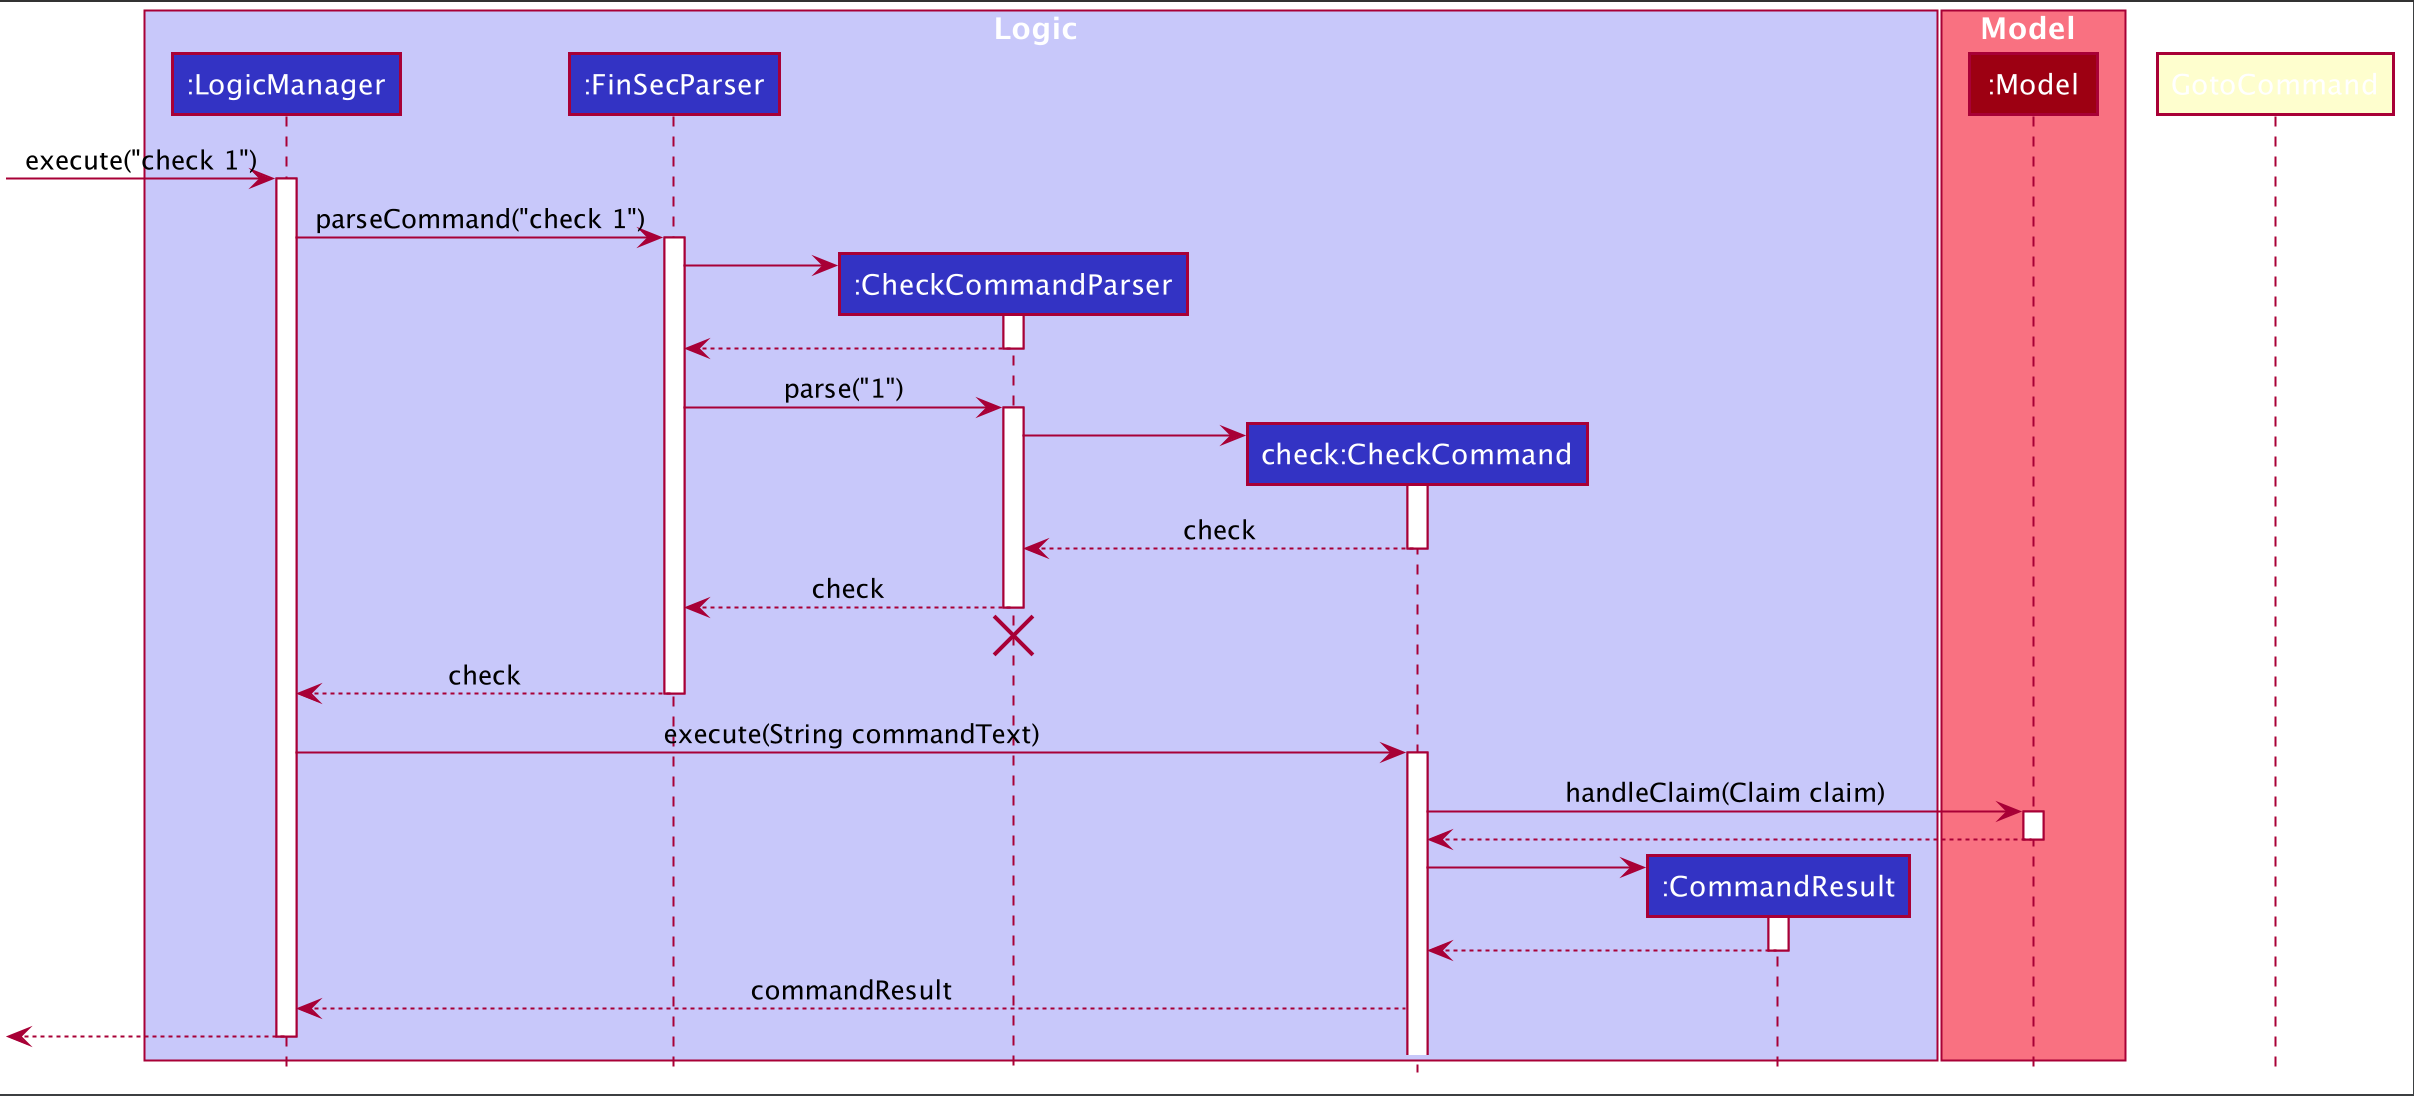
check 1 command1) The only parameter after the check command in the user input is passed into the LogicManager::execute method of the LogicManager instance.
2) The LogicManager::execute method calls FinSecParser::parseCommand which receives the user input as a parameter.
-
This user input which is in
Stringformat is then formatted, the first word before the space is taken as the command word and the rest of the String is grouped together as the argument that will be used later by the CheckCommandParser. -
With the command word determined, the FinSecParser instance identifies the command as a
checkcommand and constructs an instance of the CheckCommandParser.
3) FinSecParser calls the CheckCommandParser::parse method. This instance of CheckCommandParser then takes in the rest of the string,
in this case: 1
-
An
Indexinstance is then created when the ParserUtil:parseIndex method is called. This method takes in the argument from the CheckCommandParser::parse method parameter and returns a CheckCommand with the Index instance. This Index forms the index attribute of this specific CheckCommand instance. -
When the argument for the CheckCommandParser::parse method is not recognised or present, a
ParseExceptionwill be thrown with an error message that asks for the proper usage of the check Command.
4) This newly created CheckCommand object is returned to the LogicManager instance through the CheckCommandParser and FinSecParser objects.
5) In the LogicManager object, it then calls the CheckCommand::execute method
-
The method takes in a
Modelobject to access the application’s data context, the general storage of data for the application -
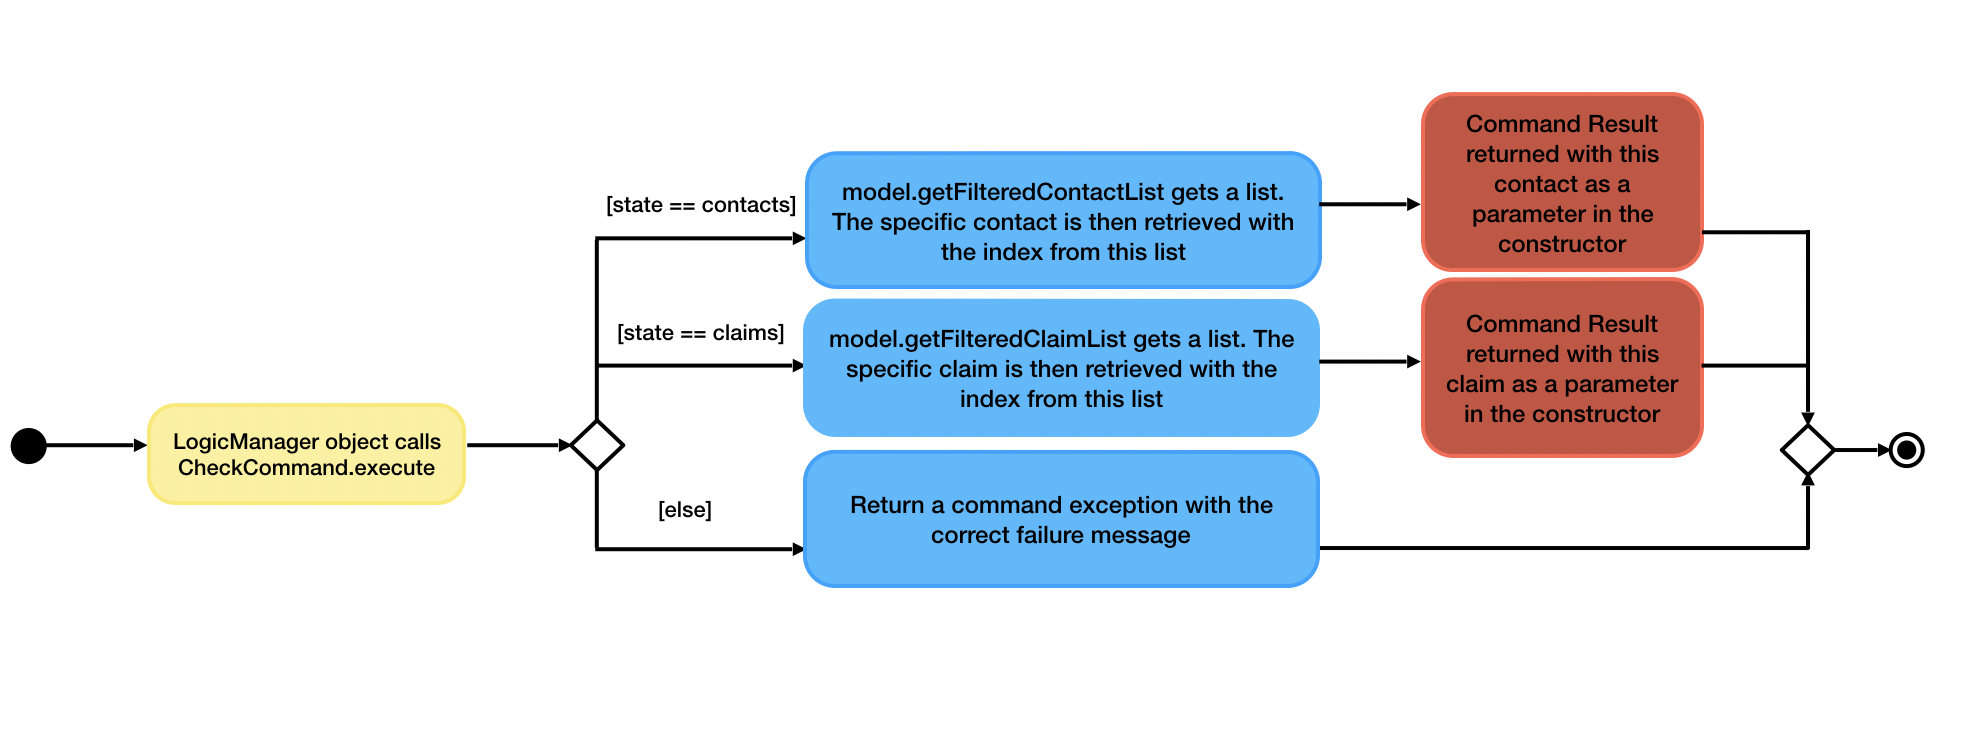
The Activity Diagram below shows the
CheckCommand::executemethod
Figure 2.5.2.2 is the activity diagram of the check command
Figure 2.5.2.2 is the activity diagram of the check command
-
The model parameter in the
CheckCommand::executemethod is checked to be not null is made before the rest of the method continues. -
The method
UiManager::getStateis called to ensure the state of the currentViewis one of the 2, namelycontactsorclaims.
6) Depending on which alternative is chosen based on the index of the gotoView, the model instance will then be updated with the correct list
of items.
-
If the user is in the claims list, the method
Model::getFilteredClaimListis called to get the latest list of claims -
The specific
claimToShowis then retrieved through thegetmethod from the list -
An instance of
CommandResultis then returned with the specific success message, the boolean for showClaim in theCommandResultconstructor to be set to true and thisclaimToShowis passed into the constructor as a parameter. -
If the index that was retrieved through the
Model::getIndexmethod is invalid or larger than the size of the list, then aCommandExceptionwill be thrown with theMESSAGE_FAILUREstatic attribute.
7) This GotoCommand::execute method completes by returning a new CommandResult with the specific success message to its calling method
which is LogicManager::execute.
8) LogicManager::execute method returns a commandResult instance to the calling method which is MainWindow::executeCommand
-
The specific feedback is then retrieved through
CommandResult::getFeedbackToUserand set in the result display of the MainWindow.
9) The methods CommandResult::isClaim or CommandResult::isContact are then invoked to check if this commandResult instance is a claim or a contact
then the methods CommandResult::giveClaim or CommandResult::giveContact are called to give the specific objects respectively. Either of these objects
will then be passed as parameter to the ModelManager::handleClaim or Model::handleContact methods.
10) The code snippet below shows the Model::handleClaim method
@FXML
    public static void handleClaim(Claim claim) {
        IndividualClaimWindow individualClaimWindow = new IndividualClaimWindow(claim);
        if (!individualClaimWindow.isShowing()) {
            individualClaimWindow.show();
        } else {
            individualClaimWindow.focus();
        }
}-
This method creates a new
IndividualClaimWindowwith the claim object that was passed as a parameter. If the window is not showing, theIndividualClaimWindow::showmethod is called else it will call theIndividualClaimWindow::focusmethod to focus on the current claim.
Why was it implemented this way?
The pop-up method seems to be the best way to attract the attention of the user and make sure that the user can see clearly what he wants to check at that point in time. A pop-up is also easy because it allows the user to return immediately to the lists of claims or contacts and he/she can continue to work on his tasks immediately.
Design Considerations
-
Show a pop-up of the individual card
-
Advantage: Clearly shows the user what he/she is checking
-
Disadvantage: Inconvenient for people with dual screens as the pop-up may appear on another screen
-
I decided to proceed with this option because it is the best way of making the individual window clear to the user.
-
-
Remove the whole list from view and isolates the desired claim or contact needed
-
Advantage: Does not require the pop-up, another window to be shown
-
Disadvantage: Might not catch the attention of the user
-