Introduction

[github]
Hi! My name is Wei Gen.
I am currently a second year student in NUS School of Computing, pursuing a Bachelor of Computing (Honours).
This project portfolio page aims to document the contributions I have made in the development of FinSec, a project that my team and I completed for the module CS2103T. This project has definitely been greatly beneficial to my own learning and self-development in becoming a more competent software engineer.
Overview
FinSec is an application that was created with the end goal of aiding Financial Secretaries of any organisation in managing their financial data, mainly their contacts, claims, incomes and budget. It is a Command Line Interface (CLI) based tool to cater to computing professionals who are highly adept at typing but also provides a Graphical User Interface (GUI) interface for any users (like you!) to easily view interact with FinSec.
Role
My main role was to act as the Team Lead for the project, completing team tasks for the project and managing general tasks for the team members. As I was the only one who has been in the position of our target audience and could best understand their user requirements, so I was also the one to set the directions of the project.
I also developed the Claims feature (including logic, storage and model), as well as adding the association between Claims and Contacts. I also created the documentation and tests that came along with the features.
Summary of contributions
-
Major enhancement: added the Claim feature
-
What it does: To allow users to add Claim entries into the FinSec application and track their claim entries.
-
Justification: The
Claim featureis a vital feature to the FinSec application since that the majority of organisations and clubs have claims to keep track of. -
Implementation: The Person class in Address Book 3 (AB3) is remodelled to resemble a claim entry (with additional attributes of ID, Description, Amount, Date and Status).
-
Highlights: The implementation of this feature is fairly manageable since that it is an adaptation of the Person class. However, there is much more coupling compared to the Person class, thus it is more complex. There are also more stringent testing required, such as
Dateparsing.
-
-
Minor enhancement: added the Approve and Reject Claim features
-
What it does: To allow users to approve or reject pending claims.
-
Justification: Claims can have different statuses, and
Budgetwill behave differently depending on their statuses. -
Implementation: ApproveClaimCommand and RejectClaimCommand will check whether the claim chosen is a PendingClaim, and only if it is can its status be approved or rejected respectively.
-
-
Minor enhancement: added the association between Claims and Contacts
-
What it does: To ensure that adding a claim into the app’s list of claims will also add the claim into the associated contact’s list of claims as well.
-
Justification: Each claim added is associated to a contact. The user will be able to view all the claims associated to a contact when viewing them using the CheckCommand.
-
Implementation: During the addition of a claim, the app checks if there is a contact with the entered name. Only if there is an existing contact for the claim will the command be executed. It also adds the Claim ID to the contact’s list of claims.
-
Highlights: I have also added a table to the IndividualContactWindow for the user to view the details of every claim of each contact easily when they use
checkcommand on the contact.
-
-
Code contributed: [All commits][Project Code Dashboard]
-
Other contributions:
-
Project management:
-
Managed the release of version
v1.2on GitHub -
Created GitHub organisation, team repository and managed access for the team.
-
Integrated various build services into the team repository.
-
-
Documentation
-
Community
-
Enhancements to existing features:
-
Tools:
-
Integrated Travis, AppVeyor and Netlify into our project.
-
-
Contributions to the User Guide
Given below are sections I contributed to the User Guide. They showcase my ability to write documentation targeting end-users. |
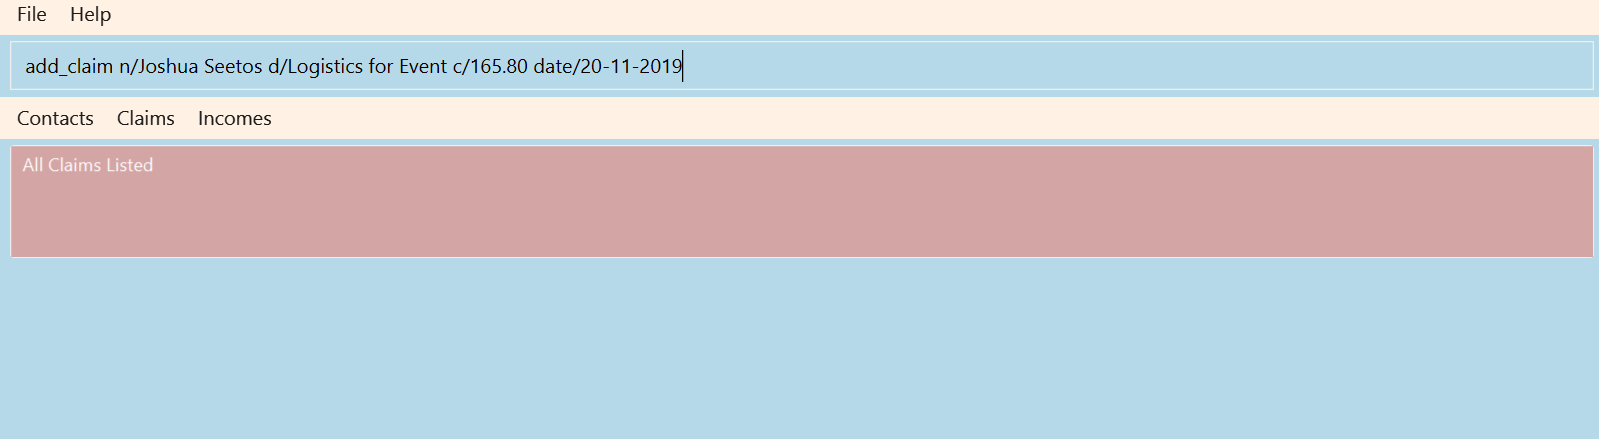
Adding a claim : add_claim
To add a claim to the claim list.
Keyword: add_claim
Format: add_claim n/NAME d/DESCRIPTION_OF_CLAIM c/AMOUNT date/DATE [t/TAG]
Example:
add_claim n/Lee Wei Gen d/Sports Equipment c/115.2 date/29-12-2019 t/Sports t/Equipment
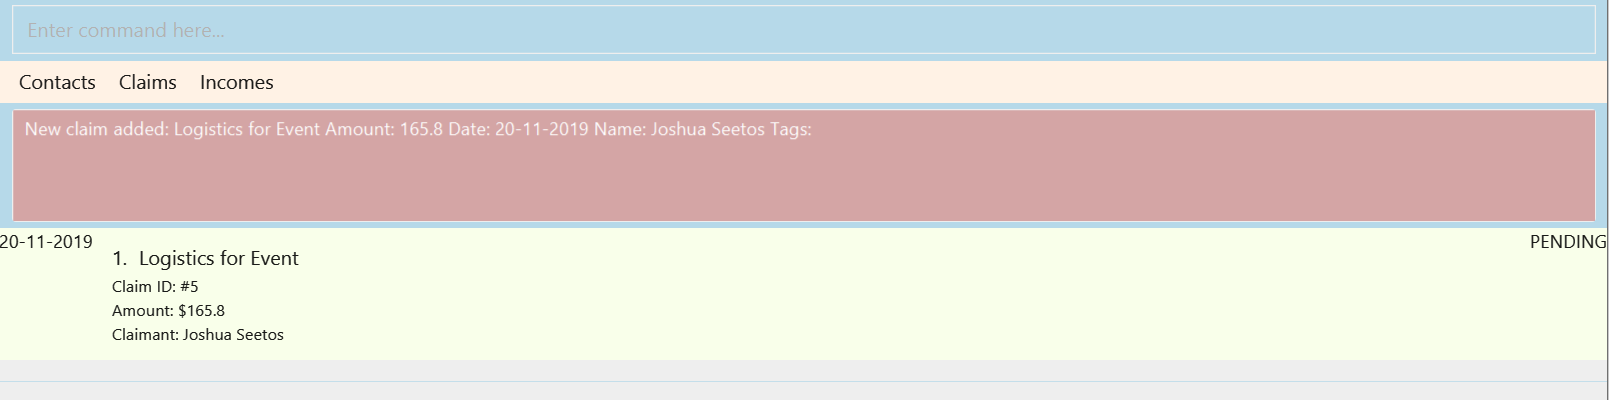
Figure 3.4.1 and Figure 3.4.2 shows what you can expect to see after adding a claim.
Warning
-
AMOUNTshould be up to 2 decimal places only. -
DATEshould be a valid date in the form of "dd-MM-yyyy"(eg. 29-02-2019 not valid). -
A contact must already exist with the inputted
NAME(if not who is claiming it?)
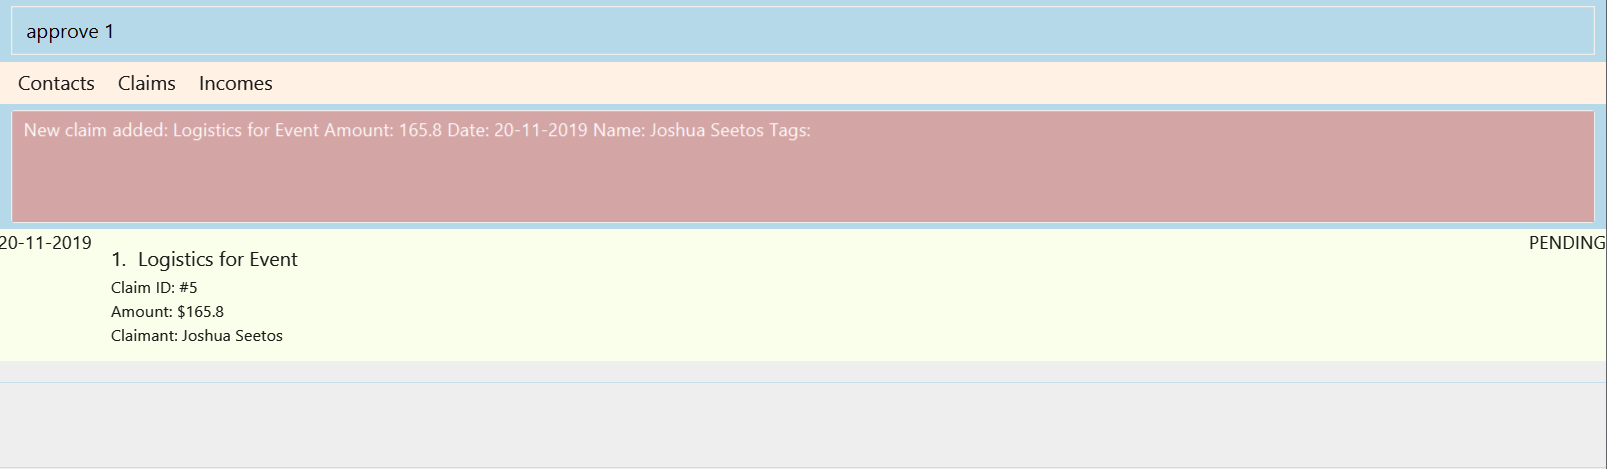
Approving a claim : approve
To approve a claim at the specified INDEX.
Keyword: approve
Format: approve INDEX
Example:
approve 1
The above example approves the first claim in the claim list.
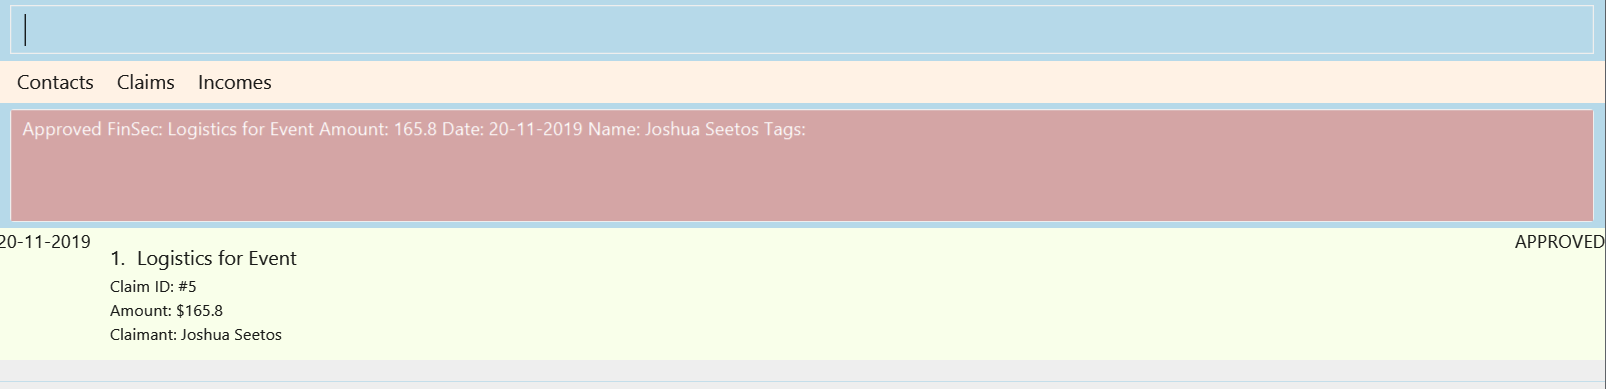
Figure 3.5.1 and Figure 3.5.2 shows what you can expect to see after approving a claim.
Warning
-
The claim list must be currently displayed.
-
Claim at the specified
INDEXmust be a pending claim. -
INDEXrefers to the index number shown in the displayed claim list. -
INDEXmust be a positive integer 1, 2, 3, …, and cannot be larger than the maximum index of the displayed claim list.
Rejecting a claim : reject
To reject a claim at the specified INDEX.
Keyword: reject
Format: reject INDEX
Example:
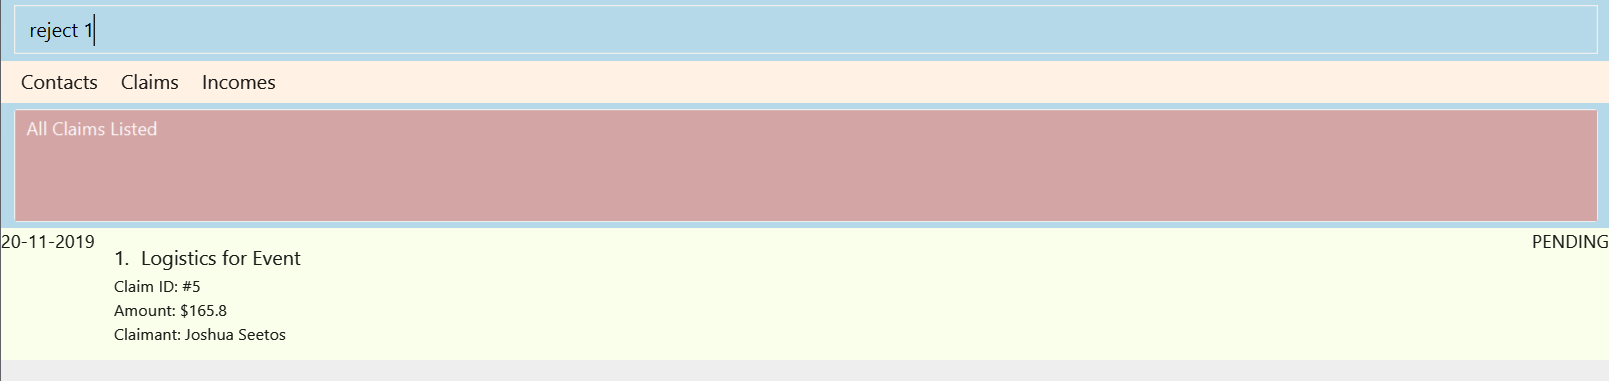
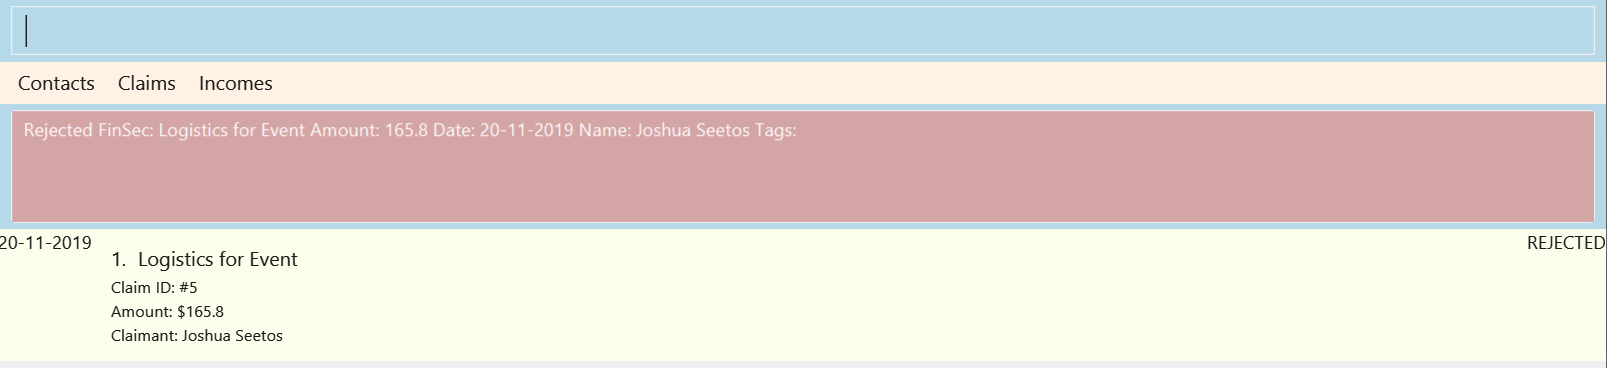
reject 1
The above example rejects the first claim in the claim list.
Figure 3.6.1 and Figure 3.6.2 shows what you can expect to see after rejecting a claim.
Warning
-
Warning as per Approve command!
Contributions to the Developer Guide
Given below are sections I contributed to the Developer Guide. They showcase my ability to write technical documentation and the technical depth of my contributions to the project. |
Claim feature
Claim is meant to model a claim made by a person. It has the following fields: Id, Description, Amount,
Date, Name and Tags.
Adding a Claim
Overview
The add_claim command allows for admins to register Claims into FinSec.
The format for the add_claim command is as follows:
add_claim n/<NAME> d/<DESCRIPTION> c/<CASH AMOUNT> date/<DATE> [t/<TAG>]
The add claim add_claim mechanism is facilitated by AddClaimCommand and AddClaimCommandParser, taking in the
following input from the user: Description, Amount, Date, Name and optionally Tags, which will construct
Claim objects.
Implementation
Figure 9 is an activity diagram that models the workflow of the addition of a claim.
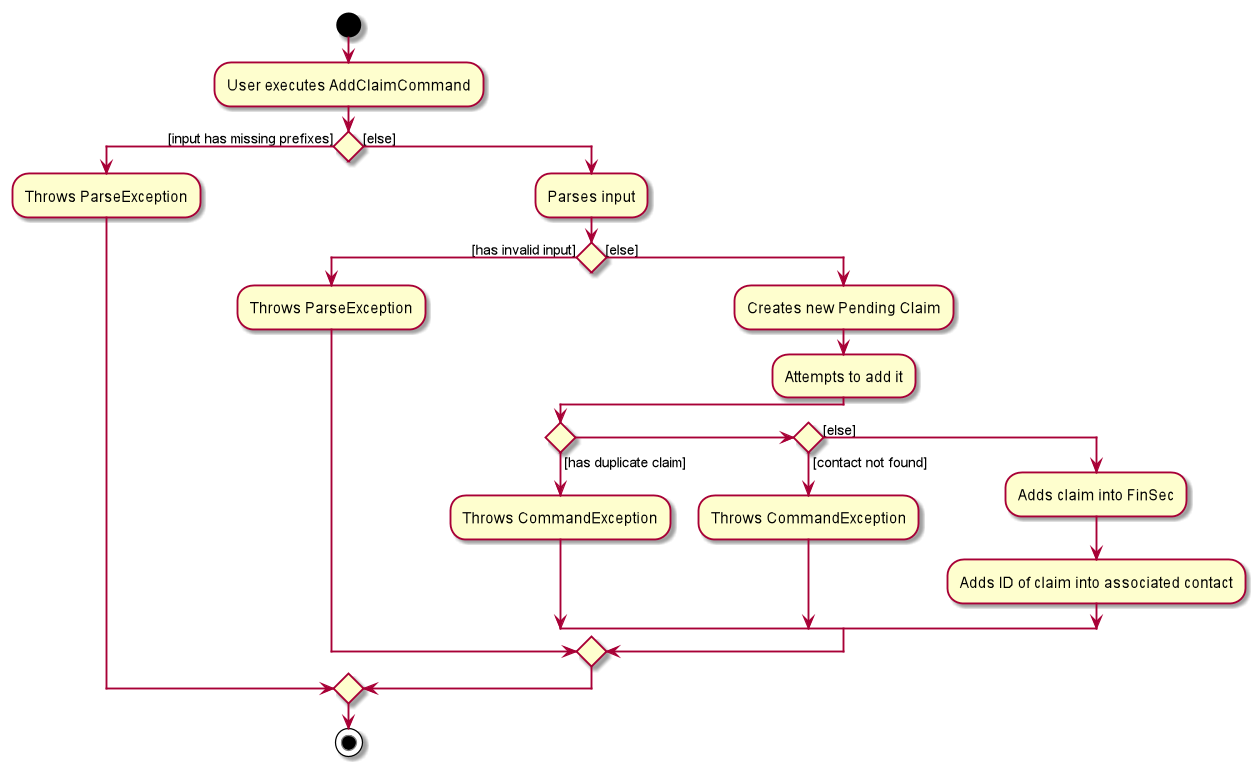
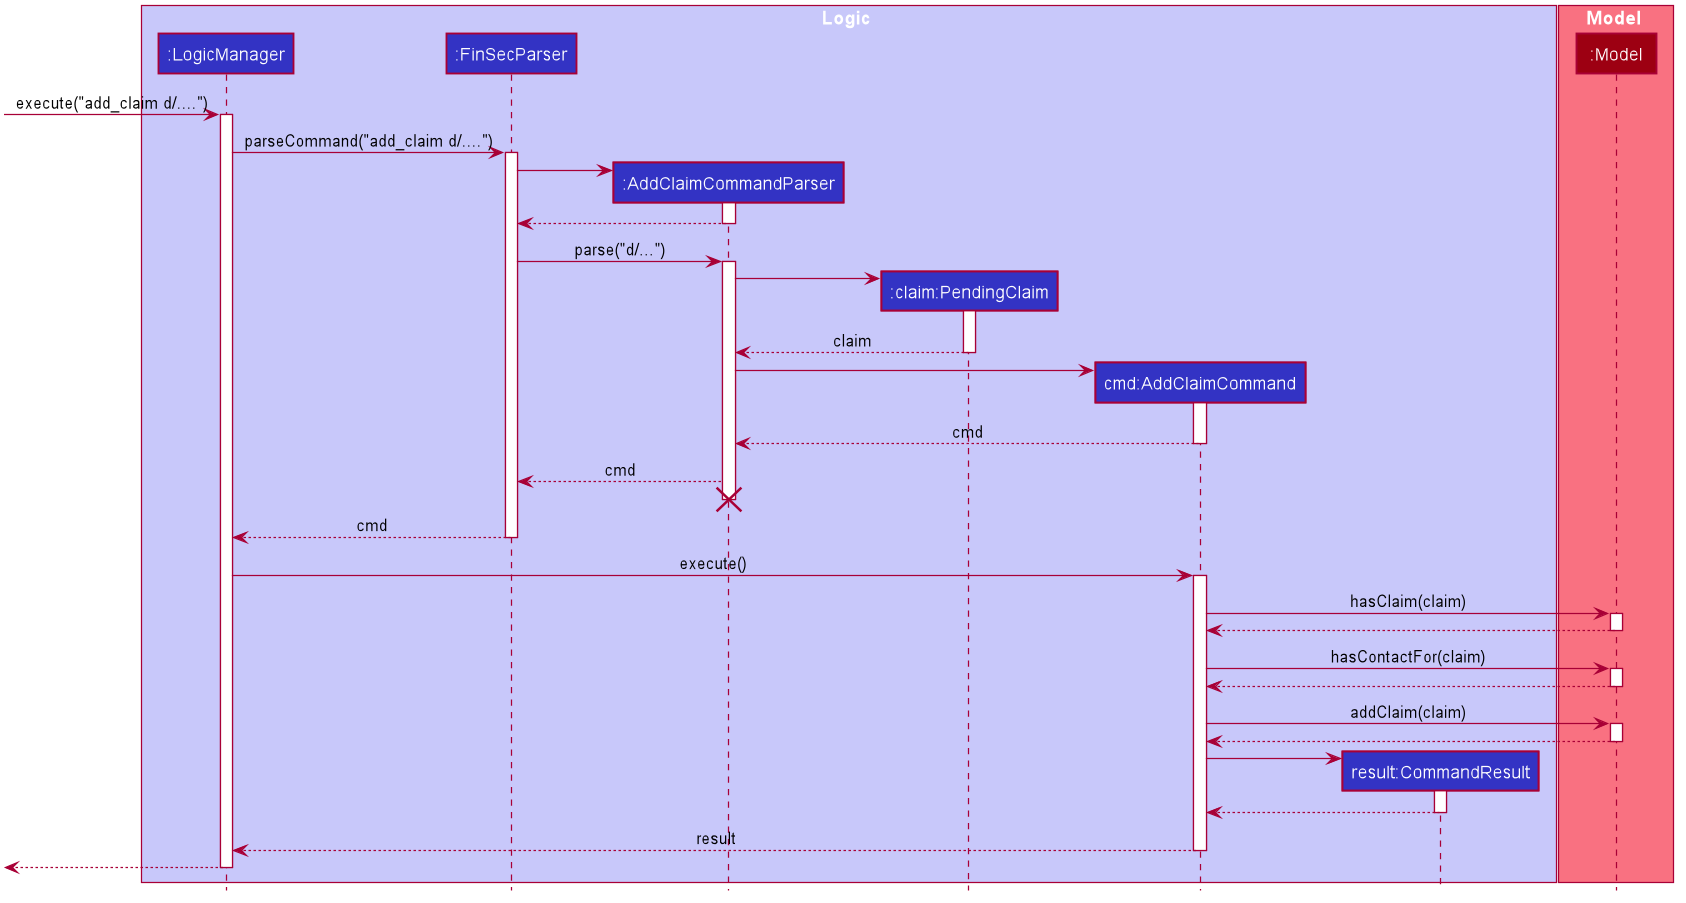
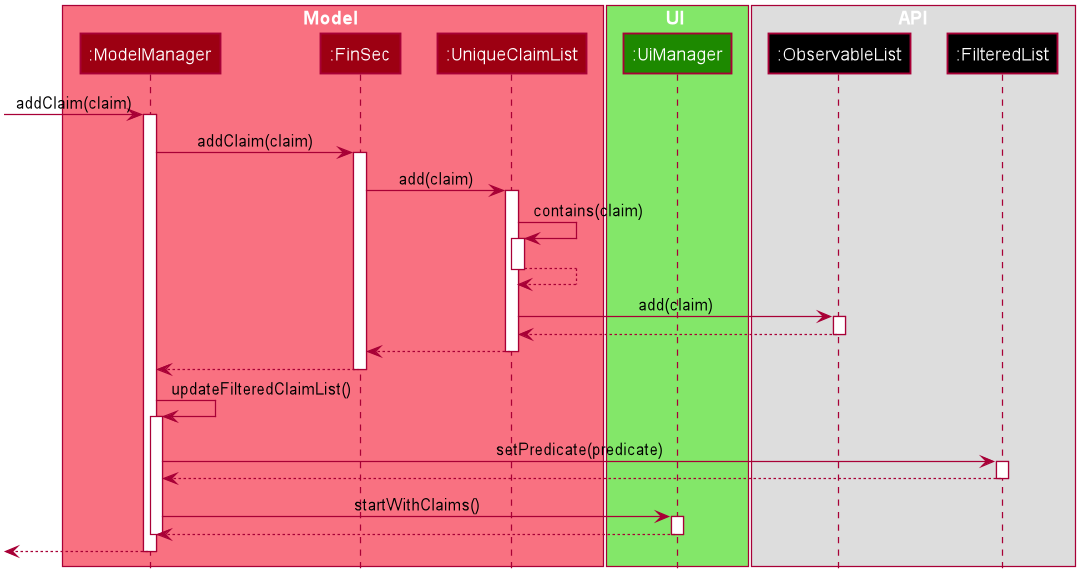
Figure 10 and 11 shows the sequence diagrams in executing the AddClaimCommand.
-
Upon calling for the command, the
AddClaimCommandParser#parse()will be executed:-
This operation takes in a String input from the user that will create
Claimobjects based on the prefixes 'd/', 'c/', 'date/', 'n/' and 't/'. The String value after the individual prefixes will create the respective object: d/description, c/amount, date/date, n/nameand t/tags. A regex validation check will be imposed upon the creation of each argument. Any checks that fails the validation would prompt the user on the failed component. -
Each of the parameters will be checked whether they are valid:
-
amountusesParserUtil#parseAmount()to ensure that cash amount would only contain numbers and a maximum of 2 decimal places. -
dateusesDate#isValidDate()to ensure that the date entered is in the correct format of DD-MM-YYYY. The date also has to be a valid date (29-02-2019 is invalid but 29-09-2016 is valid). An example of validation in code is shown below.
-
-
public static final String VALIDATION_REGEX = "(31[\\-.](0[13578]|1[02])[\\-.](18|19|20)[0-9]{2})|((29|30)[\\-.](01|0[3-9]|1[1-2])[\\-.](18|19|20)[0-9]{2})|((0[1-9]|1[0-9]|2[0-8])[\\-.](0[1-9]|1[0-2])[\\-.](18|19|20)[0-9]{2})|(29[\\-.](02)[\\-.](((18|19|20)(04|08|[2468][048]|[13579][26]))|2000))";
public static boolean isValidDate(String test) {
        return test.matches(VALIDATION_REGEX);
}-
After the validation checks are completed successfully, a
Claimobject will be constructed withId,Description,Amount,Date,NameandTagsas the parameters. -
AddClaimCommandParserwill then return anAddClaimCommandobject withClaimas its attribute. -
AddClaimCommand#executewill check against all existing contacts against the inputnameto make sure the contact exists:
@Override
public CommandResult execute(Model model) throws CommandException {
        requireNonNull(model);
        if (model.hasClaim(toAdd)) {
                throw new CommandException(MESSAGE_DUPLICATE_CLAIM);
        }
        if (!model.hasContactFor(toAdd)) {
                throw new CommandException(MESSAGE_CONTACT_NOT_FOUND);
        }
        model.addClaim(toAdd);
        return new CommandResult(String.format(MESSAGE_SUCCESS, toAdd));
}
Example
Given below is an example usage scenario of how add_claim mechanism behaves at each step.
Step 1: The user executes:
add_claim n/Melissa d/Logistics for Sports Day c/150.60 date/21-12-2019
This is intended to add a Claim of $150.60 for Logistics for Sports Day by Melissa.
Step 2: LogicManager uses FinSecParser#parse() to parse input from the user.
Step 3: FinSecParser determines which command is being used and creates the respective parser. In this case,
AddClaimCommandParser is being created and the user’s input will be passed in as a parameter.
Step 4: AddClaimCommandParser will do a validation check on the user’s input before creating and returning a
AddClaimCommand object with Claim as its attribute.
Step 5: LogicManager will execute AddClaimCommand#execute(), checking whether there is an existing Claim and also
whether there is an existing contact for the claim, then adding the PendingClaim into the Model which is handled by the
ModelManager.
Step 6: During the addition of claim into the UniqueClaimsList in FinSec, FinSec#addClaimIntoContact will also
be called, adding the Id of the claim to the associated contact’s claims.
Step 7: AddClaimCommand will return a CommandResult to the LogicManager which will then be returned back to
the user.
During the design of our add_claim function, specifically its association with Contacts, we considered other
alternatives as well.
| Design Consideration | Pros and Cons |
|---|---|
Adding the claim into contact by its object |
Pros : This allows the claim to be stored inside the contact itself, thus is easily accessible. Cons : It is more difficult ensuring that both the same claim in the contact and in the |
Adding the claim into contact by its Id |
Pros : Since each claim has an unique Id, it can easily be retrieved from Cons : Every time we retrieve a claim using its |
We have decided to opt for the first option primarily because it reduces the number of potential bugs and the complexities involved. Moreover, as we are trying to push a Minimum Viable Product, the implementation is still fast enough for small-scale organisations to pick up our app and use it, minimising the cons.
Approving a Claim
This feature allows the user to approve a PendingClaim from the UniqueClaimList through its index.
The approve claim feature is facilitated by the ApproveClaimCommandParser and the ApproveClaimCommand.
The ApproveClaimCommand is part of the logic component of our application. It interacts with the model and storage
components of our application.
Rejecting a Claim
This feature allows the user to reject a PendingClaim from the UniqueClaimList through its index.
The approve claim feature is facilitated by the RejectClaimCommandParser and the RejectClaimCommand.
The RejectClaimCommand is part of the logic component of our application. It interacts with the model and storage
components of our application.